Why use a LAN Cable? When you are transferring large amounts of data from one computer to another, the fastest way is via a LAN cable. It is one of the oldest and fastest ways of transferring data securely. Using the Ethernet cable is the obvious choice because the cheapest Ethernet cable support speed up to 1GBPS. And even if you use USB 2.0 to transfer data, it will still be fast as USB 2.0 supports speeds up to 480 MBPS.
Transfer files between Two Computers using LAN cables
You should have a LAN cable with you to get started with this option. Once you connect both computers with LAN cable the rest of the steps are very straightforward:
Transfer files between Two Computers using LAN cables Step 1: Connect Both Computers via a LAN Cable Step 2: Enable Network Sharing on both Computers Step 3: Configure LAN Settings Step 4: Configure WORKGROUP Step 5: Transfer files between two Computers using LAN
Step 1: Connect Both Computers via a LAN Cable
The first step is to connect both the Computers with the help of the LAN cable. And it doesn’t matter which LAN cable you use (ethernet or crossover cable) on a modern PC as both of the cables have few functional differences.
Step 2: Enable Network Sharing on both Computers
Type control in Windows Search then click on Control Panel from the search result.
Now click on Network & Internet from the Control Panel.
Under Network and Internet, click on Network and Sharing Center.
Click on the “Change advanced sharing settings” link from the left-hand window pane.
Under Change sharing options, click on the downwards arrow next to All Network.
Next, checkmark the following settings under All Network:
Turn on sharing so anyone with network access can read and write files in the Public folders Use 128-bit encryption to help protect file sharing connections (recommended) Turn off password protected sharing
Note: We are enabling public sharing in order to share files between the two connected computers. And to make the connection successful without any more configuration we have opted for sharing without any password protection. Although this is not a good practice but we can make an exception for this once. But make sure to enable the Password protected sharing once you are done with sharing the files or folders between the two Computers.
- Once done, finally click on the Save changes button.
Step 3: Configure LAN Settings
Once you have enabled the sharing option on both computers, now you need to set static IP on both computers:
To enable the sharing option, navigate to Control Panel and click on Network & Internet.
Under Network and Internet click on Network & Sharing center then choose Change adapter setting in the left pane.
Once you click on the Change adapter settings, the Network connections window will open. Here you need to choose the right connection.
The connection which you have to choose is Ethernet. Right-click on the Ethernet network and choose the “Properties” option.
Also Read: Fix Ethernet Not Working in Windows 10 [SOLVED] 5. Ethernet Properties window will pop-up, select Internet Protocol Version 4 (TCP/IPv4) under the Networking tab. Next, click on the Properties button at the bottom.
Checkmark “Use the following IP address” and enter the below-mentioned IP address on the first computer: IP Address: 192.168.1.1 Subnet mask: 225.225.225.0 Default Gateway: 192.168.1.2
Follow the above steps for the second computer and use the below-mentioned IP configuration for the second computer: IP Address: 192.168.1.2 Subnet mask: 225.225.225.0 Default Gateway: 192.168.1.1
Note: It is not necessary to use the above IP address, as you can use any Class A or B IP address. But if you are not sure about the IP address then you should use the above details. 8. If you have followed all the steps carefully, you will see two computer names under the Network option on your computer.
Step 4: Configure WORKGROUP
If you have connected the cable properly and done everything exactly as mentioned, then it is the time to start sharing or transferring the files or folders between the two computers. It is very important to ensure that you have connected the right Ethernet cable.
In the next step, you need to right-click on This PC and choose Properties.
Click on the Change settings link next to the name of the Workgroup. Here you need to make sure that workgroup value should be the same on both the computers.
Under the Computer Name window click on the Change button at the bottom. Usually, Workgroup is named as Workgroup by default, but you can change it.
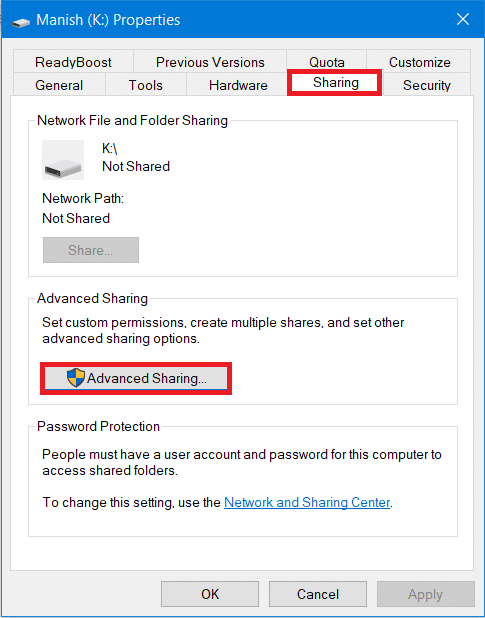
Now you need to choose the drive or folder that you want to share or give access. Right-click on the Drive then select Properties.
Under the Properties tab, switch to the Sharing tab and click on the Advanced Sharing button.
Now in the Advanced Setting window, checkmark “Share this folder” then click on Apply followed by OK button.
At this stage, you will have successfully connected the two Windows computers to share your drives between them. Finally, you have connected two computers via LAN cable to share your drives between them. The file size doesn’t matter as you can instantly share it with another computer. Also Read: How to Transfer Files from Android to PC
Step 5: Transfer files between two Computers using LAN
Right-click on the particular folder or file that you want to transfer or share then select Give access to and choose Specific People option.
You will get a file-sharing window where you need to select the “Everyone” option from the drop-down menu, then click on the Add button. Once done click on the Share button at the bottom.
3. Below dialog box will appear which will ask if you want to turn on File sharing for all public networks. Choose any one option as per your choice. Choose first if you want your network to be a private network or second if you want to turn on file sharing for all networks.
Note down the network path for the folder that will appear as other users will need to access this path in order to view the content of the shared file or folder.
Click on the Done button available at the bottom right corner then click on the Close button. That’s it, now go back to the second computer on which you want to access the above-shared files or folders and open Network Panel then click on the other computer’s name. You will see the folder name (which you shared in the above steps) and now you can transfer the files or folders by simply copying and pasting. Now you can instantly transfer as many files as you want. You can easily navigate to the Network panel from This PC and click on the Computer name in order to access the files & folders of the particular computer. Conclusion: File transfer via LAN or Ethernet cable is the oldest method used by users. However, the relevance of this method is still alive because of its ease of use, instant transfer speeds, and security. While opting for other methods of file transfer and data, you would be having fear of data theft, data misplace, etc. Moreover, other methods are time-consuming if we compare them with the LAN method for transferring data. Hopefully, the aforementioned steps will definitely work out for you to connect and transfer files between two computers using the LAN cable. You just need to make sure that you follow all steps carefully and don’t forget to complete the previous step before moving to the next one.


![]()