This tutorial is going to be about how to configure WordPress Yoast Seo Settings 2022, just follow the steps and at the end of this tutorial, you will be a master of the WordPress Yoast Seo plugin. As of writing this guide, the Yoast SEO plugin is at version 3.7.0 with a whopping 1 million-plus active installs. WordPress Yoast Seo Settings 2022 is a single-stop solution for all your SEO needs but sometimes it can be tricky to configure this advanced plugin and for beginners, it’s a nightmare to configure this plugin. You know most of the users only use 10% of this plugin, yes you heard it right and that’s why everyone should reconsider using it to its full potential and then see the results. WordPress Yoast Seo Settings is going to give you 100% access to this powerful plugin, just follow this step-by-step guide.
Features of WordPress Yoast SEO Plugin:
Technical WordPress Search Engine Optimization Edit your .htaccess and robots.txt file Import & Export functionality Meta & Link Elements Multi-Site Compatible Social Integration RSS Optimization XML Sitemaps Page Analysis Breadcrumbs
WordPress Yoast Seo Settings 2022
Technically before configuring the plugin you must install the Yoast Seo plugin and if you have already done that you can skip this part. To install the WordPress Yoast Seo plugin, just go to Plugins > Add New and search for Yoast Seo.
Features of WordPress Yoast SEO Plugin: WordPress Yoast Seo Settings 2022 Dashboard Titles & Metas Social Settings XML Sitemaps Advanced Tools Search Console
Once you see the Yoast SEO in the search result, just click Install Now and then activate the plugin.
Dashboard
Let’s head towards the WordPress Yoast SEO dashboard which can be accessed via SEO> Dashboard.
Dashboard doesn’t have any settings, it just shows the problem with your SEO and latest notifications related to the plugins. Moving on the next tab which is General settings.
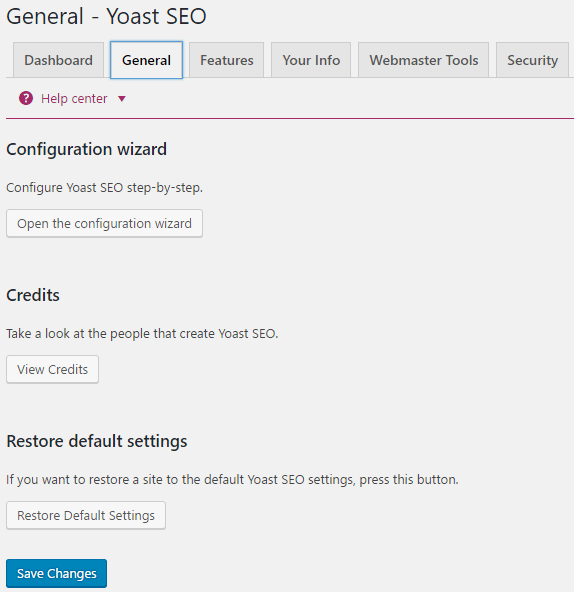
Here you can run configuration wizard if you want to fill out general settings related to your blog, take a look at the credits of WordPress Yoast SEO plugin and most important of all Restore this plugin to default settings if something unexpected happens to your plugin after configuration. Next, comes the Feature tab which has the following settings:
Make sure Advanced settings pages and OnPage.org settings are enabled as they are important. Advanced settings let you access settings such as Title & Metas, Social, XML sitemaps and much more.
And the Admin Menu Bar setting can be disabled no problem in that as it is not technically important. Next, comes the Your Info tab where you fill out the information about yourself or your company.
The webmaster tools tab is one of the most important settings present in WordPress Yoast SEO plugin which lets you sign up for various Webmasters tool and let you verify your website by just adding the meta values.
Just sign up for each webmaster by clicking the on the links one by one and add your website URL to each one of them. When asked for verification just choose HTML Tag and you would be able to see something like this:
Copy everything between the double quotes in content (excluding the quotes) and paste the content in the above-specified field then click save changes. After that click verifies button above to complete the verification process. Similarly, follow this for every webmaster present above. Don’t forget to add your blog sitemap to all the search consoles if you need help read this: Track Broken Links with Google Webmaster Tool. The last is security in general settings where if you have editors for your website and you don’t trust them with things like no index and redirects, disable this.
Titles & Metas
First setting under Titles & Metas is General where you have the option of Title separator, readability analysis, and keyword analysis.
Select a appropriates title separator or you can select the one shown above and enable both Readability analysis and Keyword analysis. Next tab is Homepage settings, here you can configure Homepage SEO titles and Meta description. Well, it’s important if you want search engines to know about your blog, so fill the meta description tab carefully.
In Post type, you will configure SEO settings for all your posts types. Here you have three sections namely Post, Page and Media type. Here you can define SEO settings for the post, page and media sections of your blog.
This is how I have configured it for my blog. Well, the title template and Meta description template is defined so that if you don’t write custom titles and meta description of your post then these will be used. Meta robots tell whether something will get indexed by search engines or not. If set to noindex it will not be indexed so always set it to index. Date in Snippet Preview means if you want to show the date of your blog post when it’s shown in Google search result or any other search engines result. Well if you writing fresh content you can set it to show as people are more tend to click on fresh content but if you have an evergreen content blog then its best hide your date in snippet preview. Yoast SEO Meta Box controls whether Yoast’s content optimization options are shown or not when editing a page, post, category etc.
Similarly, both pages and media options can be set as shown in the above image. Next tab in Titles & Metas – Yoast SEO is Taxonomies where I prefer using index and show option for my categories as these pages can be useful for visitors. This allows category pages to be indexed in search engines.
After Categories we have Tagged and it’s not recommended to index tags in search engines so set it to noindex as when tags are indexed they lead to duplicate content which can be very harmful to your blog.
Similarly, set format based archives to noindex.
Next section is author based and date based archive settings. Here you can either allow author based archives to be indexed or can set them to noindex. Well, if you are running a single author blog it’s recommended to set it to noindex as it will prevent duplicate content on your blog.
But if you are running a multi-author blog then you can enable this option. Next is date-based archive settings and they should also be set to noindex as to prevent duplicate content but you can enable this option if you want to display content according to month and date.
Don’t mess with special pages and 404 pages if you don’t know what you are doing, they should be set exactly as above. The last section in Titles & Metas – Yoast SEO plugin is Others where you can configure Sitewide meta settings as shown below:
If you have a blog post where “Next” or “page 2” button is used then its best to set subpages of archives to noindex as this will prevent search engines to show the second-page search result as you don’t want visitors directly on the second page. When this is set to noindex search engines will only show the first-page result. Meta keywords tag should be disabled as Google doesn’t use meta keywords now. Force noodp meta robots tag sitewide should be enabled if you want to use your own meta description, not those from DMOZ. Well, this was the last section of Titles & Metas of WordPress Yoast Seo Settings 2022.
Social Settings
Filling out Yoast’s social settings is very important as search engines can also know about your social presence. Another great benefit of this is that you can upload custom images to each post or page because sometimes images thumbnails which are automatically processed when sharing a post/page are not formatted properly. Therefore, it’s important that you fill out your social accounts here.
The next tab is about Facebook Open Graph settings, this is where you can add custom logos to your page/post.
Enable the Add Open Graph metadata, then add custom image URL, title, and description to show the Open Graph meta tags on the front page of your blog. Add an image to default settings if you want to use these images as a default image when the post/page being shared doesn’t contain any images. Similarly, save settings for all the social accounts as shown below:
First, confirm your site with Pinterest and add Google+ publisher page URL then saves changes to successfully optimize content for each social network. Now, whenever you will writing a new article or editing a page/post you will see a social tab in Yoast SEO plugin like this:
Here you can upload a custom image for each social network which you want to display as a thumbnail when sharing this post/page. Here are the dimensions in which you have to create the custom image:
Facebook Image: 1200 x 628px Google+ Image: 800 x 1200px Twitter Image: 1024 x 512px
You can also use custom Title and description for the page/post going to be shared otherwise SEO title and description will be used.
XML Sitemaps
A most important feature of this plugin is XML sitemaps, just enable this feature and WordPress Yoast SEO Settings 2022 plugin takes care of your blog’s sitemap. Well, a sitemap is needed for major search engines to index your blog and I hope you have already submitted your sitemaps to Google, Bing and Yandex search engines. If not then just follow this guide for submitting your sitemaps: Track Broken links using Google Webmaster Tool
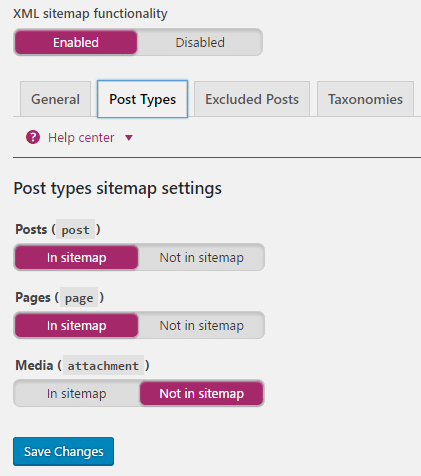
Next, is post type where you can define which post type should be included in sitemap or not.
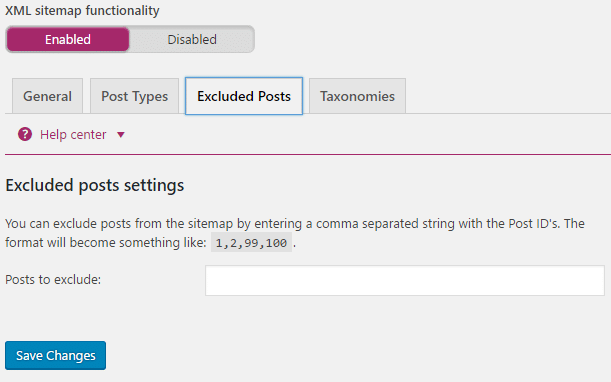
Always include posts and pages to be included in sitemap while media attachment should be excluded in the sitemap. In Excluded Posts, you could exclude individual posts to be excluded from sitemaps using Post ids.
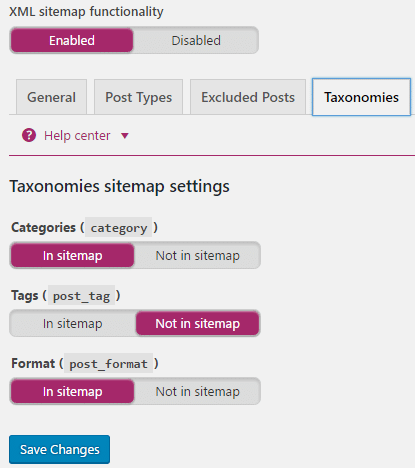
The last section in XML Sitemaps – Yoast SEO is taxonomies. Make sure categories are included in sitemaps while tags should be excluded to prevent duplicate content.
Advanced
Breadcrumbs are the navigation text that appears at the top of your page or post. Well, it’s a good idea to enable breadcrumbs but even though they are enabled you still need to learn how to insert them into your theme.
Next setting is Permalinks which is not the WordPress average permalink settings, here you can configure advanced settings related to Permalinks. Strip the category base from the category URL should be set to Remove because you don’t want to include the word “category” in your permalink structure. Redirect attachment URL’s to parent post URL should be set to No redirect.
Next do not remove stop words( an example of stop words: a, an, the, etc) from your page slugs. If you let Yoast to automatically remove the stops word you might miss out a lot on SEO. IF you still want to remove the stop words then you can do that manually on individual post or page. Remove the? replytocom Variables should be set to remove because they prevent duplicate content & if you want to know more about? replytocom then you could read about them on yoast website. Redirect ugly URLs to clean permalinks is a very nice feature of Yoast plugin but it sure does have some problems and using it is strictly Not recommended. The last section of Advanced settings is RSS well here you don’t have to touch anything so leave it as it is.
Tools
Tools by Yoast SEO is another useful feature of this plugin. Here you can use the bulk editor to quickly edit your post Title and Description easily without going to individual posts again & again.
You can use File editor to edit robots.txt and .htaccess files easily. Well, import and export are used if you want to either import the WordPress Yoast SEO Settings from another blog or you want to export your WordPress Yoast SEO Settings to another blog.
Search Console
Search Console allows you to access some information from Google Search Console (Webmaster Tool) directly into Yoast.
That was all you could have learned about WordPress Yoast SEO Settings 2022 but if you still have a question regarding this guide please feel free to ask them in comments. Has something to add to this guide? Disagree with me? We welcome suggestions.