In case, if any one of your files gets corrupted then it becomes hard to recreate that file or even fix it. But don’t worry there is a built-in Windows tool called System File Checker (SFC) which can act like a swiss knife and can fix corrupted or damaged system files. Many programs or third-party apps can make certain changes to the system files and once you run the SFC tool, these changes are automatically restored. So without wasting any time let’s see how to repair corrupted system files in Windows 10 with the help of the below-listed tutorial.
Now sometimes the System File Checker (SFC) command does not work well, in such cases, you can still repair the corrupted files using another tool called Deployment Image Servicing & Management (DISM). The DISM command is essential for repairing the fundamental Windows system files which are required for the proper functioning of the operating system. For Windows 7 or earlier versions, Microsoft has downloadable “System Update Readiness Tool” as an alternative.
How to Repair Corrupted System Files in Windows 10
Make sure to create a restore point just in case something goes wrong.
How to Repair Corrupted System Files in Windows 10 Method 1: Run SFC Command Method 2: Run DISM Command Method 3: Use a different program Method 4: Perform System Restore Method 5: Use Third-Party File Repair Tool
Method 1: Run SFC Command
You can run the System File Checker before doing any complex troubleshooting such as the clean installation of the operating system, etc. SFC scan & replace the corrupted system files and even if the SFC is unable to repair these files, it will confirm that whether or not the system files are actually damaged or corrupted. And in most cases, the SFC command is enough to fix the issue and repair the corrupted system files. 1.The SCF command can be only used if your system can start normally. 2.If you are unable to boot to windows, then you need to first boot your PC into safe mode. 3.Press Windows Key + X then click on Command Prompt(Admin).
4.Now type the following in the cmd and hit enter:
5.Wait for the above process to finish and once done restart your PC. 6.Next, run CHKDSK from here Fix File System Errors with Check Disk Utility(CHKDSK). 7.Let the above process complete and again reboot your PC to save changes.
Method 2: Run DISM Command
DISM (Deployment Image Servicing and Management) is a command-line tool that users or administrators can use to mount and service a Windows desktop image. With the use of DISM users can alter or update Windows features, packages, drivers, etc. DISM is a part of Windows ADK (Windows Assessment and Deployment Kit) which can be easily downloaded from the Microsoft website. Normally, the DISM command is not required but if the SFC commands fails to fix the issue then you need to run the DISM command. 1.Press Windows Key + X then select Command Prompt (Admin).
2.Type DISM /Online /Cleanup-Image /RestoreHealth and press enter to run DISM.
3.The process may take between 10 to 15 minutes or even more depending upon the level of corruption. Do not interrupt the process. 4.If the above command doesn’t work then try on the below commands: Note: Replace the C:\RepairSource\Windows with the location of your repair source (Windows Installation or Recovery Disc). 5.After DISM, run the SFC scan again through the method stated above.
6.Restart the system and you should be able to repair corrupted system files in Windows 10.
Method 3: Use a different program
If you’re facing trouble open third-party files then you can easily open that file with some other programs. Since a single file format can be opened using different programs. Different programs from different vendors have their own algorithms, so while one may work with some files whereas others won’t. For example, your Word file with .docx extension can also be opened using substitute apps like LibreOffice or even using Google Docs.
Method 4: Perform System Restore
1.Open Start or press Windows Key. 2.Type Restore under Windows Search and click on Create a restore point.
3.Select the System Protection tab and click on the System Restore button.
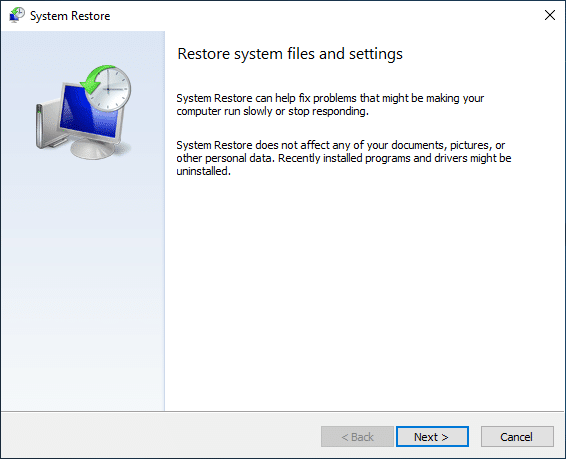
4.Now from the Restore system files and settings window click on Next.
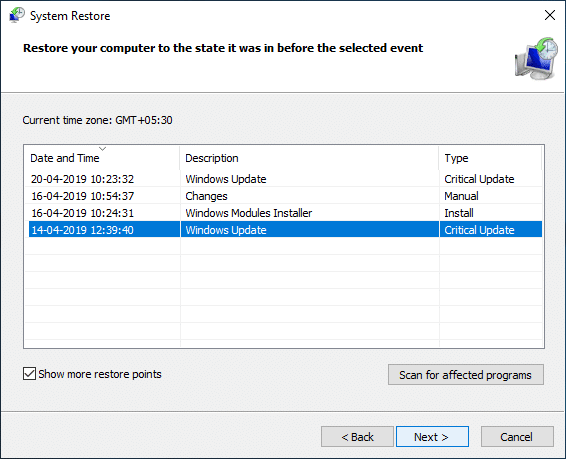
5.Select the restore point and make sure this restore point is created before you were facing the BSOD issue.
6.If you can’t find old restore points then checkmark “Show more restore points” and then select the restore point.
7.Click Next and then review all the settings you configured. 8.Finally, click Finish to start the restore process.
9.Restart the computer to complete the System Restore process.
Method 5: Use Third-Party File Repair Tool
There are a lot of third-party repairing tools which are available online for diverse file formats, some of them are File Repair, Repair Toolbox, Hetman File Repair, Digital Video Repair, Zip Repair, Office Fix. Recommended:
4 Ways to Update Graphics Drivers in Windows 10 Fix Task Scheduler Not Running In Windows 10 7 Ways to Fix PUBG Crashes on Computer Reset or Recover Your Gmail Password
Hopefully, using one of the above methods, you will be able to Repair Corrupted System Files in Windows 10, but if you still have any questions regarding this tutorial then feel free to ask them in the comment section.