Why is hosts file needed in your computer?
The www.google.com we use, for instance, is a hostname that we use to access the site. But in a network, sites are located using numerical addresses like 8.8.8.8 which are called IP addresses. Hostnames are used because it is not practically possible to remember the IP addresses of all the sites. So, whenever you type any hostname in your browser, the hosts file is first used to map it to its IP address and then the site is accessed. If this hostname does not have a mapping in the hosts file, your computer fetches its IP address from a DNS server (domain name server). Having a hosts file eases up the time used to query a DNS and receive its response every time a site is being accessed. Also, the mappings contained in the hosts file to override the data retrieved from a DNS server.
Why is hosts file needed in your computer? How to modify hosts file for your own use? How to Edit the Hosts File in Windows 10 Edit the Hosts File on Windows 8 and Windows 10 Edit the Hosts File on Windows 7 and Vista Edit the Hosts File on Windows NT, Windows 2000, and Windows XP Edit the Hosts File using Third Party Apps How to protect your hosts file?
How to modify hosts file for your own use?
Editing a hosts file is possible and you might need to do it for a variety of reasons.
You can create website shortcuts by adding a required entry in the hosts file that maps the website IP address to a hostname of your own choice. You can block any website or ads by mapping their hostname to the IP address of your own computer which is 127.0.0.1, also called loopback IP address.
How to Edit the Hosts File in Windows 10
Make sure to create a restore point just in case something goes wrong. The hosts file is located at C:\Windows\system32\drivers\etc\hosts on your computer. Since it is a plain text file, it can be opened and edited in notepad. So without wasting any time let’s see How to Edit the Hosts File in Windows 10 with the help of the below-listed tutorial.
Edit the Hosts File on Windows 8 and Windows 10
Press Windows Key + S to bring up the Windows Search box.
Type notepad and in the search results, you will see a shortcut for Notepad.
Right-click on Notepad and select ‘Run as administrator’ from the context menu.
A prompt will appear. Select Yes to continue.
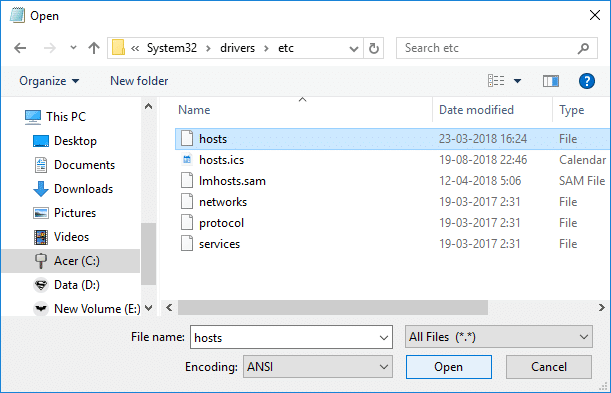
Notepad window will appear. Select File option from the Menu and then click on ‘Open‘.
To open the hosts file, browse to C:\Windows\system32\drivers\etc.
If you can’t see the hosts file in this folder, select ‘All Files’ in the option below.
Select the hosts file and then click on Open.
You can now see the contents of the hosts file.
Modify or make the required changes in the hosts file.
11. From Notepad menu go to File > Save or press Ctrl+S to save the changes. Note: If you had opened the notepad without selecting ‘Run as administrator’, you would have got an error message like this:
Edit the Hosts File on Windows 7 and Vista
Click on the Start button. Go to ‘All Programs’ and then ‘Accessories’. Right-click on Notepad and select ‘Run as administrator’. A prompt appears. Click on Continue. In notepad, go to File and then Open. Select ‘All Files’ from the options. Browse to C:\Windows\system32\drivers\etc and open the hosts file. To save any changes, go to File > Save or press Ctrl+S.
Edit the Hosts File on Windows NT, Windows 2000, and Windows XP
Click on the Start button. Go to ‘All Programs’ and then ‘Accessories’. Select Notepad. In notepad, go to File and then Open. Select ‘All Files’ from the options. Browse to C:\Windows\system32\drivers\etc and open the hosts file. To save any changes, go to File > Save or press Ctrl+S.
In the hosts file, each line contains one entry which maps an IP address to one or more hostnames. In each line, IP address comes first, then followed by space or tab character and then the hostname(s). Suppose you want xyz.com to point to 10.9.8.7, you will write ’10.9.8.7 xyz.com’ in the new line of the file.
Edit the Hosts File using Third Party Apps
A more simple way to edit hosts file is to use third party applications which give you more features like blocking sites, sorting entries, etc. Two of such softwares are: HOSTS FILE EDITOR You can easily manage your hosts file with this software. Apart from editing the hosts file, you can duplicate, enable, disable one or more entries at a time, filter and sort entries, archive and restore various hosts file configurations, etc.
It gives you a tabular interface for all the entries in your hosts file, with columns IP address, hostname as well as comment. You can enable or disable entire hosts file by right clicking on Hosts File Editor icon in the notification. HOSTSMAN HostsMan is another freeware application that lets you manage your hosts file with ease. Its features include built-in hosts file updater, enable or disable hosts file, Scan hosts for errors, duplicates and possible hijacks, etc.
How to protect your hosts file?
Sometimes, malicious software use the hosts file to redirect you to unsafe, unwanted sites containing malicious content. The hosts file can be harmed by Viruses, Spyware or Trojans. In order to protect your hosts file from being edited by some malicious software, 1.Go to the folder C:\Windows\system32\drivers\etc. 2.Right click on the hosts file and select properties.
3.Select ‘Read-only’ attribute and click on Apply.
Now you can only edit your hosts files, block ads, create your own shortcuts, assign local domains to your computers, etc. Recommended:
How to Switch Between Browser Tabs Using Shortcut Key Change from Public to Private Network in Windows 10 How to Fix Monitor Screen Flickering Issue How to Make One Page Landscape in Word
I hope the above steps were helpful and now you can easily Edit the Hosts File in Windows 10 but if you still have any questions regarding this guide then feel free to ask them in the comment’s section.