How to Fix Windows 10 Update Error 0x80070103
You can manually update the pending downloads from official Windows Update sites. In this section, Microsoft has acknowledged the issue and confirmed that the 0x80070103 error occurred for two reasons. Microsoft stated that If you see Windows Update Error 80070103 when installing updates, you may be trying to install a driver that is already installed on your computer or has a worse compatibility rating than an already installed driver.
How to Fix Windows 10 Update Error 0x80070103 What Causes Error 0x80070103? Method 1: Run Windows Update Troubleshooter Method 2: Repair System Files Method 3: Run Virus Scan Method 4: Update Drivers Manually Method 5: Update Windows Manually Method 6: Modify Windows Update Service Method 7: Reset Update Components Method 8: Disable Services and Startup Apps Method 9: Turn Off Automatic Updates Method 10: Block Windows Driver Updates Method 11: Uninstall Suspicious Apps in Safe Mode
What Causes Error 0x80070103?
This section has compiled a list of scenarios where you will typically face this error under certain circumstances. This part is necessary to understand the root cause that triggers the issue so that you might follow appropriate troubleshooting methods.
Installing the Update for the Second Time: When Windows Update (WU) components get confused with additional installed software, your PC declares it as a second piece of software and fails to update the request, leading to this issue. Installing the Same Update for an Already Installed Driver: When Windows Update (WU) components try to install an incompatible version of the already installed driver, you will face this issue. Third-Party Interference: When a third-party security suite or any incompatible programs interferes with your PC, you will face this issue.
Method 1: Run Windows Update Troubleshooter
Before you try anything else, there is an easy way to solve the issue automatically by running a Windows Update troubleshooter. If there are any inconsistent functions in the Windows Update components, the troubleshooter will identify and resolve them accordingly with the collection of repairing strategies.
Press Windows + I keys simultaneously to launch Settings.
Click on the Update & Security tile, as shown.
Go to Troubleshoot menu in the left pane.
Select Windows Update troubleshooter and click on Run the troubleshooter button shown highlighted below.
Wait for the troubleshooter to detect and fix the problem. Once the process is complete, restart your PC.
Method 2: Repair System Files
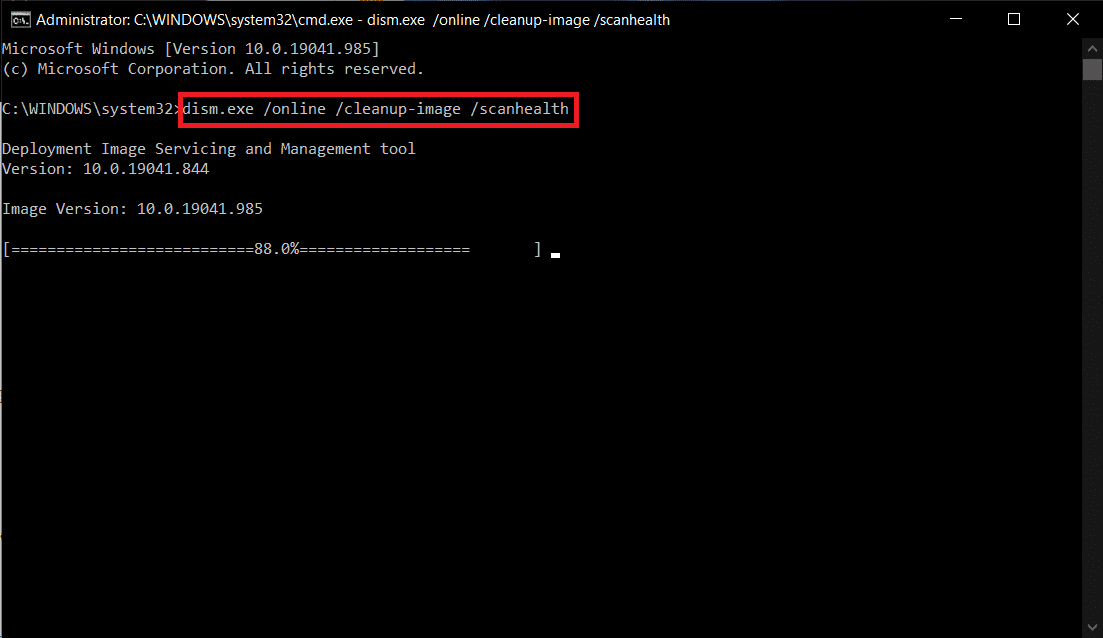
The primary reason that triggers this error is corrupt system files. Windows 10 users can automatically scan and repair their system files by running System File Checker & Deployment Image & Servicing Management tools. Hence, follow the below-mentioned steps to do so:
Hit the Windows key, type Command Prompt and click on Run as administrator.
Click on Yes in the User Account Control prompt.
Type chkdsk C: /f /r /x command and hit Enter key.
Note: If you are prompted with a message, Chkdsk cannot run…the volume is… in use process, then, type Y and hit Enter. 4. Type sfc /scannow and press Enter key to run System File Checker scan. Note: A system scan will be initiated and it will take a couple of minutes to finish. Meanwhile, you can continue performing other activities but be mindful of not accidentally closing the window.
- After completing the scan, it will show either of these messages:
Windows Resource Protection did not find any integrity violations. Windows Resource Protection could not perform the requested operation. Windows Resource Protection found corrupt files and successfully repaired them. Windows Resource Protection found corrupt files but was unable to fix some of them.
- Once the scan is finished, restart your PC.
- Again, launch Command Prompt as administrator and execute the given commands one after the other: Note: You must have a working internet connection to execute DISM commands properly.
Also Read: Fix Windows 10 Update Pending Install
Method 3: Run Virus Scan
Sometimes, Windows defender fails to recognize the threat when any virus or malware uses the system files. The malware or viruses are intended to damage the user’s system, steal private data, or spy on a system without the user’s knowledge. There are a few anti-malware software available to overcome malicious software. This software routinely scans and safeguards your system. Therefore, to avoid error 0x80070103, run an antivirus scan in your system and check if the problem is solved. Then, follow the below-mentioned steps to do so.
Hit Windows + I keys simultaneously to launch Settings.
Here, click on Update & Security settings as shown.
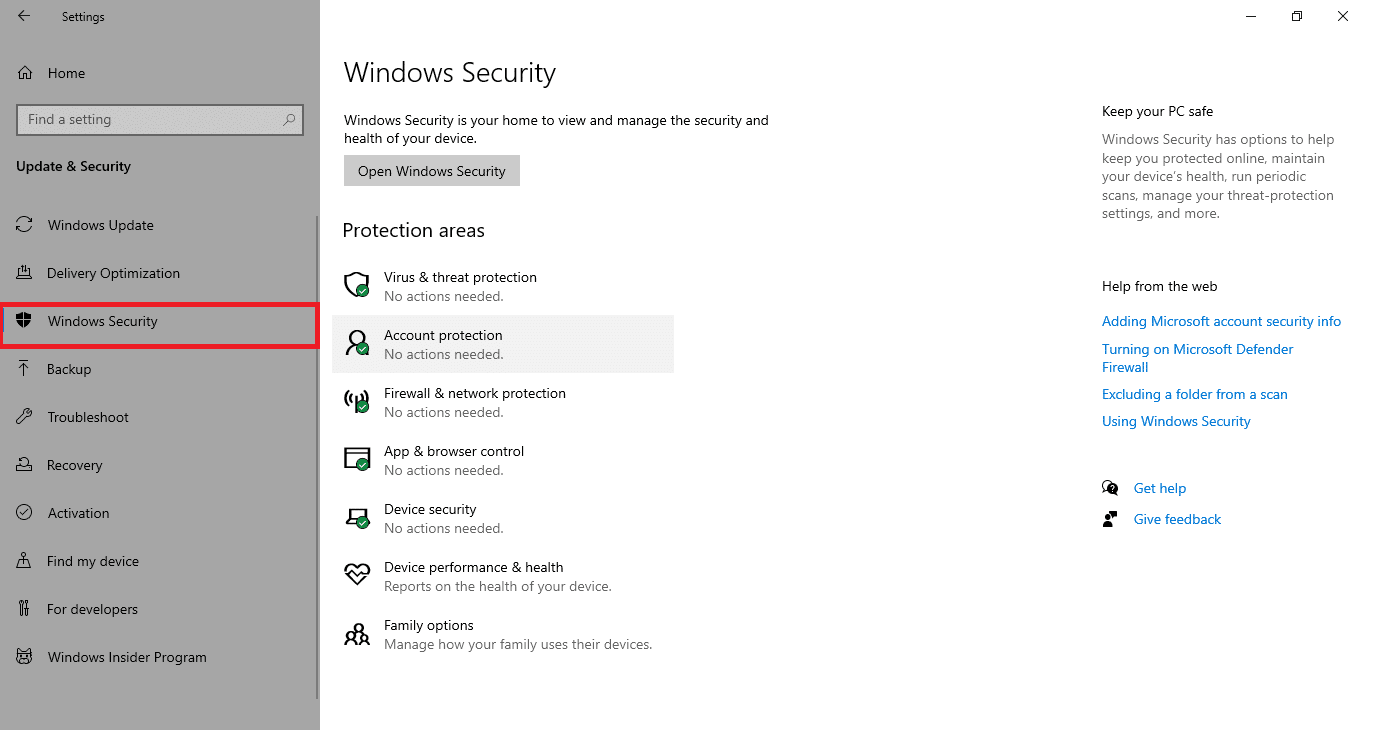
Go to Windows Security in the left pane.
Click on the Virus & threat protection option in the right pane.
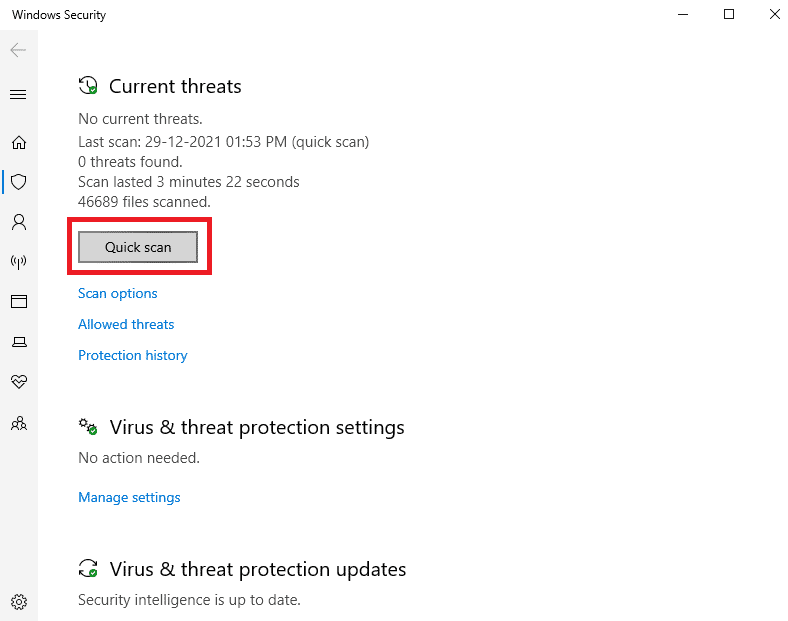
Click on the Quick Scan button to search for malware.
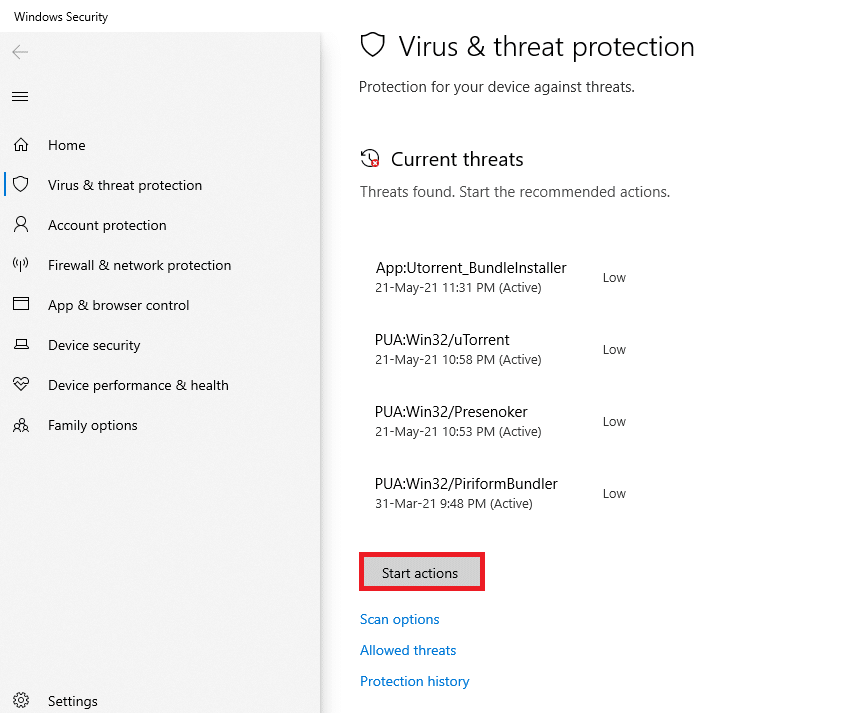
6A. Once the scan is done, all the threats will be displayed. Click on Start Actions under Current threats.
6B. If there is no threat in your device, the device will show the No current threats alert.
Method 4: Update Drivers Manually
You can try installing drivers manually to get out of Windows update 0x80070057 error & error code 0x80070103 as instructed below.
Click on Start, type Device Manager, and hit the Enter key.
Double-click on Display adapters to expand it.
Now, right-click on your video card driver and select Update driver, as depicted.
Next, click on Search Automatically for drivers to install the updated driver on your PC.
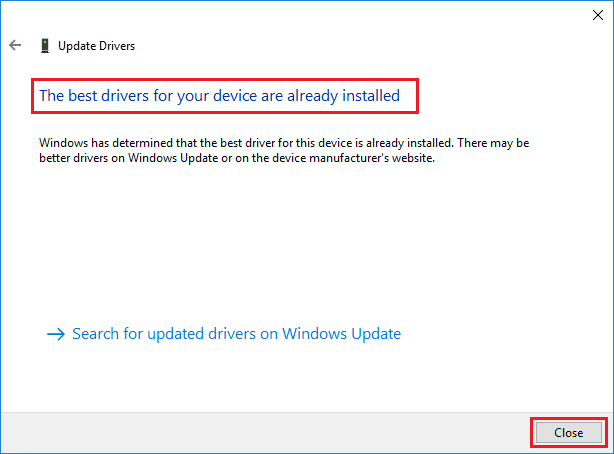
5A. The drivers will update to the latest version if they are not updated. Restart your PC to install them. 5B. If they are already in an updated stage, the following screen will be displayed. Click on Close to exit the window and restart your PC
- Here, steps to update the Graphics driver are demonstrated. Follow them accordingly for other drivers too. Also Read: Fix Windows 10 Blue Screen Error
Method 5: Update Windows Manually
If you have confirmed that there are no corrupt files or malicious programs on your PC and all essential services are running smoothly, you can manually download the updates as instructed below:
Press the Windows + I keys together to open Settings in your system.
Select Update & Security as shown.
Now, click on the View update history option, as highlighted below.
In the list, note down the KB number that is pending to be downloaded due to the error message.
Here, type the KB number in the Microsoft Update Catalog search bar as depicted below.
Follow the on-screen instructions to download and install the update manually.
Method 6: Modify Windows Update Service
On certain occasions, the update might fail and miss a few of the files. Then you have to delete or rename these installation files to resolve this issue. The update service must be disabled to modify these files since they would be running in the background. Follow the below steps to do so:
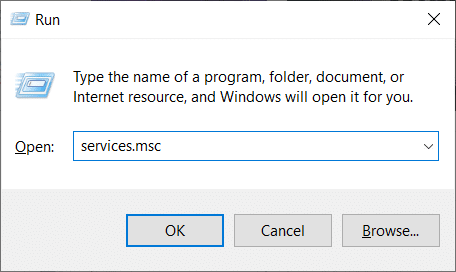
Open the Run dialog box and type services.msc. Hit the Enter key to launch the Services window.
Now, scroll down the screen and right-click on Windows Update.
Here, click on Stop if the current status displays Running.
You will receive a prompt, Windows is attempting to stop the following service on Local Computer… Wait for the prompt to be cleared in around 3 to 5 seconds.
Launch File Explorer by clicking Windows + E keys together and navigate to the given path: C:\Windows\SoftwareDistribution\DataStore
Select all the files and folders by pressing Ctrl + A keys together.
Right-click on the empty space and select Delete option to remove all the files and folders from the DataStore location.
Next, navigate to C:\Windows\SoftwareDistribution\Download and Delete all files similarly.
Return to the Services window, right-click on Windows Update and select the Start option as depicted below.
As earlier, Wait for Windows is attempting to start the following service on Local Computer… prompt to disappear.
Close the Services window and Reboot your PC. Also Read: How to Fix Error 0x80070002 Windows 10
Method 7: Reset Update Components
The net results of this method include:
Restarting of the BITS, MSI Installer, Cryptographic, and the Windows Update Services. Renaming of the SoftwareDistribution and Catroot2 folders.
This should fix error code 0x80070103 or 0x80070490 on Windows 10.
- Launch Command Prompt as administrator.
- Now, type the following commands one by one and hit Enter after each command.
Method 8: Disable Services and Startup Apps
The issues concerning error code 0x80070103 can be fixed by a clean boot of all essential services and files in your Windows 10 system, as explained in this method. Note: Make sure you log in as an administrator to perform Windows clean boot.
Launch the Run dialog box by pressing the Windows + R keys together.
Type msconfig and hit the Enter key to open System Configuration.
The System Configuration window appears. Next, switch to the Services tab.
Check the box next to Hide all Microsoft services, and click on Disable all button as shown highlighted.
Now, switch to the Startup tab and click the link to Open Task Manager as depicted below.
Now, the Task Manager window will pop up. Select the startup tasks which are not required and click Disable displayed in the bottom right corner.
Exit Task Manager and System Configuration window. Finally, restart your PC. Also Read: Fix Windows Update Error 0x80070005
Method 9: Turn Off Automatic Updates
The automatic update feature will keep your PC updated to the latest version whenever an update is available. If you face this error code 0x80070103 due to automatic updates, you could try to turn off the Automatic Updates feature as follows:
Press and hold Windows + I key together to open Settings.
Now, select Update & Security as shown.
Now, click on Advanced options in the right pane, as shown below.
In the next window, scroll down to the Pause updates section and click on the Select date option as highlighted.
Now, choose the date until which updates are to be disabled.
Method 10: Block Windows Driver Updates
You can prevent error code 0x80070103 in your PC by preventing your computer from re-installing any driver updates. Please make a note that this method will block all available updates of any driver, not just one. Follow the below-mentioned steps to hide Windows Driver Updates on your PC.
Hit the Windows key and type Control Panel in the search bar.
Now, set the View by option to Small icons and click on System setting as highlighted.
Here, scroll down the screen and click on Advanced system settings as shown.
Then, switch to the Hardware tab in the System Properties pop-up window. Click on the Device Installation Settings button shown highlighted.
Then, click on the No (your device might not work as expected) option as shown and click on the Save Changes button.
Finally, reboot your PC and check if you have fixed the issue. Also Read: How to Fix Windows 10 Won’t Update
Method 11: Uninstall Suspicious Apps in Safe Mode
Boot your PC in safe mode and try installing the apps that could be causing this error. Note: To boot your PC in safe mode, you may be prompted with a screen to enter your BitLocker key if you have an encrypted device.
Follow our guide on How to Boot to Safe Mode in Windows 10 here.
Now hit the Windows key, type apps and features, and click on Open.
Click on the conflicting/suspicious app (e.g. Battle.net) and select Uninstall option, as depicted below.
Click on Uninstall again to confirm the same.
Finally, restart your PC and check if the error code persists or not. If it does, try the next solution. Recommended:
How to Make a YouTube Account Without Gmail How to Fix Discord Camera Not Working Fix Windows Update Install Error 0x8007012a Fix Update Error 0x80888002 on Windows 11
We hope that this guide was helpful and you could fix error 0x80070103 in Windows 10. Let us know what you want to learn about next.


![]()


