Many parameters can cause WiFi not to Work, first being software updates or new installation, which might change the registry value. Sometimes your PC can’t obtain IP or DNS address automatically while it can also be a driver issue but don’t worry today we are going to see How to Fix WiFi not Working in Windows 10 with the help of the below-listed guide.
Fix WiFi not Working in Windows 10 [100% Working]
Make sure to create a restore point just in case something goes wrong.
Fix WiFi not Working in Windows 10 [100% Working] Method 1: Restart your WiFi router/modem Method 2: Change your WiFi Router Method 3: Turn Off Airplane Mode and Enable WiFi Method 4: Forget your WiFi Network Method 5: Enable WiFi from BIOS Method 6: Enable WLAN AutoConfig service Method 7: Update WiFi Drivers Method 8: Run Network Troubleshooter Method 9: Disable Microsoft Wi-Fi Direct Virtual Adapter Method 10: Uninstall Network Adapter Method 11: Reset Network Settings Method 12: Reset TCP/IP Autotuning Method 13: Use Google DNS Method 14: Disable IPv6 Method 15: Uncheck Proxy Option Method 16: Disable Intel PROSet/Wireless WiFi Connection Utility Method 17: Delete Wlansvc Files Method 18: Temporarily Disable Antivirus and Firewall Method 19: Change 802.11 Channel Width Method 20: Change the Wireless Network Mode to Default
If you cannot connect any device to the internet, then this means that the issue is with your WiFi device and not with your PC. So you need to follow the below-listed troubleshooting steps to fix the issue.
Method 1: Restart your WiFi router/modem
Turn off your WiFi router or modem, then unplug the power source from it.
Wait for 10-20 seconds and then again connect the power cable to the router.
Switch on the router, connect your device and see if this Fix WiFi is not working in Windows 10 issue.
Method 2: Change your WiFi Router
It’s time to check if the problem is with the Router or Modem itself instead of the ISP. To check if your WiFi has some hardware issues, use another old modem or borrow the router from your friend. Then configure the modem to use your ISP settings, and you are good to go. If you can connect with this router, then the problem is definitely with your router, and you may need to buy a new one to fix this problem. If you can connect to WiFi using your mobile or another device, then it means that your Windows 10 has some problem due to which it isn’t able to connect to the Internet. Anyway, don’t worry this can be easily fixed, follow the below troubleshooting steps.
Method 3: Turn Off Airplane Mode and Enable WiFi
You may have accidentally press the physical button to switch off WiFi, or some program may have disabled it. If this is the case, you can easily fix the WiFi not working with just a button press. Search your keyboard for the WiFi icon and press it to enable WiFi again. In most cases it’s Fn(Function key) + F2.
Right-click on the network icon in the notification area and select “Open Network and Internet settings“.
Click Change adapter options under Change your network settings section.
Right-click on your WiFi adapter and choose Enable from the context menu.
Again try to connect to your wireless network and see if you’re able to Fix WiFi not Working in Windows 10.
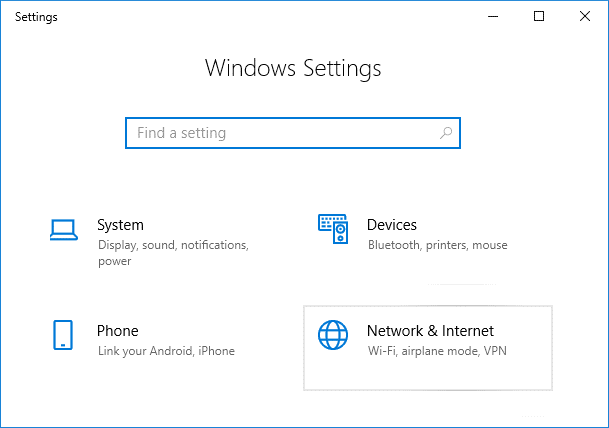
If the problem persists, then press Windows Key + I to open the Settings app.
Click on Network & Internet than from the left-hand menu select Wi-Fi.
Next, under Wi-Fi, make sure to Enable the toggle, which will enable the Wi-Fi.
Again try to connect to your Wi-Fi network, and this time it just might work.
Method 4: Forget your WiFi Network
Click on the Wireless icon in the system tray and then click Network & Internet Settings.
Then click on Manage Known networks to get the list of saved networks.
Now select the one which Windows 10 won’t remember the password for and click Forget.
Again click the wireless icon in the system tray and try to connect to your network, it will ask for the password, so make sure you have the Wireless password with you.
Once you have entered the password, you will connect to the network, and Windows will save this network for you.
Reboot your PC and see if you’re able to fix WiFi not working issue.
Method 5: Enable WiFi from BIOS
Sometimes none of the above steps would be useful because the wireless adapter has been disabled from BIOS, in this case, you need to enter BIOS and set it as default, then log in again and go to “Windows Mobility Center” through Control Panel and you can turn the wireless adapter ON/OFF.
Method 6: Enable WLAN AutoConfig service
Press Windows Key + R then type services.msc and hit Enter.
Scroll down and find the WLAN AutoConfig service in the list (press W on the keyboard to find it easily).
Right-click on WLAN AutoConfig and select Properties.
Make sure to select Automatic from the Startup type drop-down and click on Start.
Click Apply, followed by OK.
Reboot your PC to save changes and try to connect to your WiFi network to see if your WiFi works.
Method 7: Update WiFi Drivers
Press Windows key + R and type devmgmt.msc and hit Enter to open device manager.
Expand Network adapters, then right-click on your Wi-Fi controller(for example Broadcom or Intel) and select Update Drivers.
On the Update Driver Software window, select “Browse my computer for driver software.”
Now select “Let me pick from a list of device drivers on my computer.”
Try to update drivers from the listed versions. Note: Select the latest drivers from the list and click Next.
If the above didn’t work then go to the manufacturer’s website to update drivers: https://downloadcenter.intel.com/
Reboot to apply changes.
Method 8: Run Network Troubleshooter
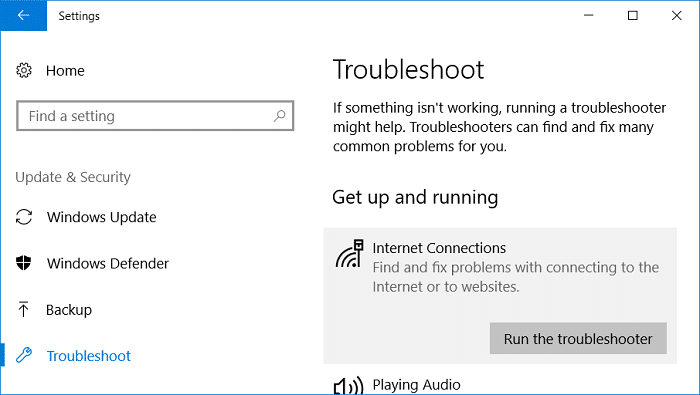
Press Windows Key + I to open Settings then click on Update & Security.
From the left-hand menu, select Troubleshoot.
Under Troubleshoot, click on Internet Connections and then click Run the troubleshooter.
Follow further on-screen instructions to run the troubleshooter.
If the above didn’t fix the issue then from the Troubleshoot window, click on Network Adapter and then click on Run the troubleshooter.
Reboot your PC to save changes.
Method 9: Disable Microsoft Wi-Fi Direct Virtual Adapter
Press Windows Key + R then type devmgmt.msc and hit Enter to open Device Manager.
Expand Network adapters then click on View and select Show hidden devices.
Right-click on Microsoft Wi-Fi Direct Virtual Adapter and select Disable.
Reboot your PC to save changes.
Method 10: Uninstall Network Adapter
Press Windows Key + R then type devmgmt.msc and hit Enter to open Device Manager.
Expand Network Adapters and find your network adapter name.
Make sure you note down the adapter name just in case something goes wrong.
Right-click on your network adapter and select Uninstall.
If ask for confirmation, select Yes.
Restart your PC and Windows will automatically install the default drivers for the Network adapter.
If you cannot connect to your network, then it means the driver software isn’t automatically installed.
Now you need to visit your manufacturer’s website and download the driver from there.
Install the driver and reboot your PC. By reinstalling the network adapter, you can get rid of this WiFi not Working in Windows 10 issue.
Method 11: Reset Network Settings
Press Windows Key + I to open Settings then click on Network & Internet.
From the left-hand menu, select Status.
Now scroll down and click on Network reset at the bottom.
Again click on “Reset now” under Network reset section.
This will successfully reset your network adapter, and once it is complete, the system will be restarted.
Method 12: Reset TCP/IP Autotuning
Open Command Prompt. The user can perform this step by searching for ‘cmd’ and then press Enter.
Type the following commands:
Now enter this command to verify that previous functions were disabled: netsh int tcp show global
Reboot your PC.
Method 13: Use Google DNS
You can use Google’s DNS instead of the default DNS set by your Internet Service Provider or the network adapter manufacturer. This will make sure that the DNS your browser is using has nothing to do with the YouTube video not loading. To do so, 1. Right-click on the network (LAN) icon in the right end of the taskbar, and click on Open Network & Internet Settings.
- In the settings app that opens, click on Change adapter options in the right pane.
3. Right-click on the network you want to configure, and click on Properties.
- Click on Internet Protocol Version 4 (IPv4) in the list and then click on Properties.
Also Read: Fix Your DNS Server might be an unavailable error. 5. Under the General tab, choose ‘Use the following DNS server addresses’ and put the following DNS addresses. Preferred DNS Server: 8.8.8.8 Alternate DNS Server: 8.8.4.4
- Finally, click OK at the bottom of the window to save changes.
- Reboot your PC and once the system restart, see if you’re able to Fix WiFi not Working in Windows 10.
Method 14: Disable IPv6
Right-click on the WiFi icon on the system tray and then click on “Open Network and Sharing Center.”
Now click on your current connection to open Settings. Note: If you can’t connect to your network, then use an Ethernet cable to connect and then follow this step.
Click the Properties button in the window that just open.
Make sure to uncheck Internet Protocol Version 6 (TCP/IP).
Click OK, then click Close. Reboot your PC to save changes.
Method 15: Uncheck Proxy Option
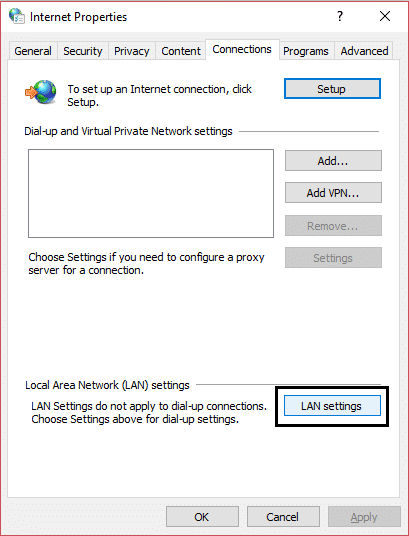
Press Windows Key + R then type inetcpl.cpl and hit enter to open Internet Properties.
Next, Go to the Connections tab and select LAN settings.
Uncheck Use a Proxy Server for your LAN and make sure “Automatically detect settings” is checked.
Click Ok then Apply and reboot your PC.
Method 16: Disable Intel PROSet/Wireless WiFi Connection Utility
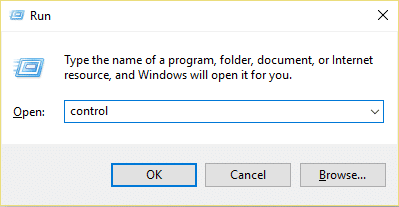
Press Windows Key + R then type control and hit Enter to open Control Panel.
Then click on Network and Internet > View network status and task.
Now on the bottom left corner, click on Intel PROset/Wireless Tools.
Next, open settings on Intel WiFi Hotspot Assistant then uncheck “Enable Intel Hotspot Assistant.”
Click OK and reboot your PC to Fix WiFi, not Working Issue.
Method 17: Delete Wlansvc Files
Press Windows Key + R then type services.msc and hit Enter.
Scroll down till you find WWAN AutoConfig then right-click on it and select Stop.
Again press Windows Key + R then type “C:\ProgramData\Microsoft\Wlansvc\” (without quotes) and hit Enter.
Delete everything (most probably the MigrationData folder) in the Wlansvc folder except for profiles.
Now open the Profiles folder and delete everything except the Interfaces.
Similarly, open the Interfaces folder then delete everything inside it.
Close File Explorer, then in services window right-click on WLAN AutoConfig and select Start.
Method 18: Temporarily Disable Antivirus and Firewall
Sometimes the Antivirus program can cause an error. To verify this is not the case here, you need to disable your antivirus for a limited time so that you can check if the error still appears when the antivirus is off.
- Right-click on the Antivirus Program icon from the system tray and select Disable.
2. Next, select the time frame for which the Antivirus will remain disabled.
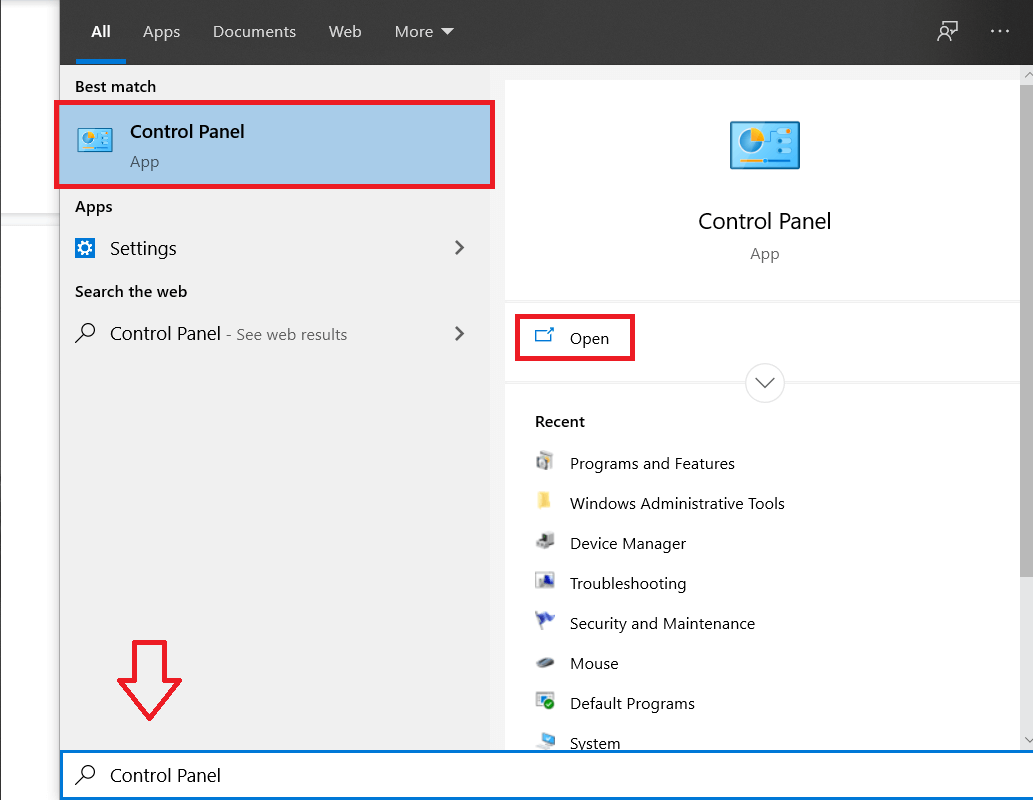
Note: Choose the smallest amount of time possible, for example, 15 minutes or 30 minutes. 3. Once done, again try to connect to open Google Chrome and check if the error resolves or not. 4. Search for the control panel from the Start Menu search bar and click on it to open the Control Panel.
Next, click on System and Security then click on Windows Firewall.
Now from the left window pane click on Turn Windows Firewall on or off.
7. Select Turn off Windows Firewall and restart your PC.
Again try to open Google Chrome and visit the web page, which was earlier showing the error. If the above method doesn’t work, please follow the same steps to turn on your Firewall again.
Method 19: Change 802.11 Channel Width
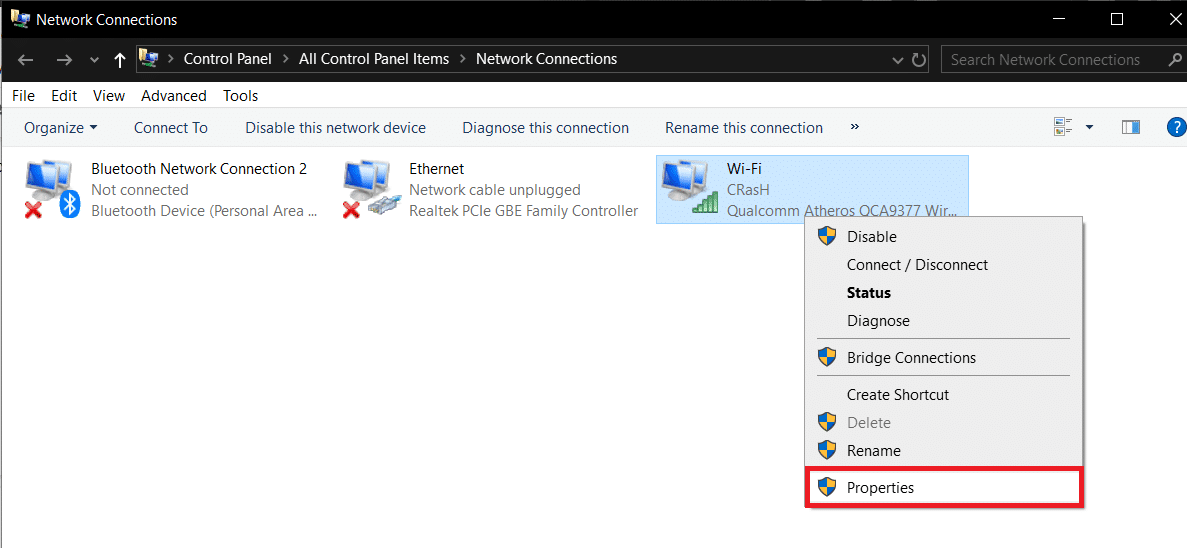
Press Windows Key + R then type ncpa.cpl and hit Enter to open Network Connections.
Now right-click on your current WiFi connection and select Properties.
Click the Configure button in the Wi-Fi properties window.
Switch to the Advanced tab and select the 802.11 Channel Width.
Change the value of 802.11 Channel Width to 20 MHz then click OK.
Method 20: Change the Wireless Network Mode to Default
Press Windows Key + R then type ncpa.cpl and hit Enter to open Network Connections.
Now right-click on your current WiFi connection and select Properties.
Click the Configure button in the Wi-Fi properties window.
Switch to the Advanced tab and select Wireless Mode.
Now change the value to 802.11b or 802.11g and click OK. Note: If the above value doesn’t seem to fix the problem, try different values to fix the issue.
Close everything and restart your PC. Recommended:
Fix WMI Provider Host High CPU Usage [Windows 10] How to Fix Taskbar Disappeared from the Desktop Fix YouTube Videos loading but not playing videos Fix YouTube Black Screen Problem [SOLVED]
That’s it, you have successfully Fix WiFi not Working in Windows 10 [SOLVED] but if you still have any questions regarding this tutorial then feel free to ask them in the comment’s section.


![]()


![]()


![]()


![]()