Internet is no longer a luxury; it is a necessity. We have become dependent on the internet for going about our day to day lives. Especially in urban societies, it is impossible to get any work done without the internet. We are habituated to staying connected to the world via the internet. Our phones are always connected to a Wi-Fi network or at least have their mobile data turned on. Therefore, it comes as a huge bummer when due to some reason we are not able to connect to the internet.
It could be poor connectivity or problem with the Wi-Fi network but if the problem lies with the phone itself, then the matter is quite concerning. We get frustrated if, in spite of the availability of a stable internet connection, our Android smartphone isn’t able to connect to it. It becomes evident when everyone around you is able to connect and use the Wi-Fi and you are not. You would be surprised to know that this problem occurs in Android devices quite frequently. In this article, we are going to help you resolve this problem if you ever find yourself in this situation.
Reasons behind “Internet May not be Available” Error
Android devices may be extremely popular and user-friendly but they too have some bugs and glitches. It is possible that from time to time your phone might start malfunctioning. One of the common problems that occur on Android is the “Internet May not be available” error.
Reasons behind “Internet May not be Available” Error Fix Internet May not be Available Error on Android 1. Reboot Your Phone 2. Switch Between Wi-Fi and Cellular Data 3. Changing DHCP mode 4. Update your Operating System 5. Forget Wi-Fi network and Connect Again 6. Reset Android Network Settings 7. Start your Device in Safe Mode
Fix Internet May not be Available Error on Android
Since now we have a clear understanding of the problem and the reasons behind it there is no further need to wait for the solutions. In this section, we are going to provide a step-wise guide to the various methods that you can apply in order to solve the problem. So, let’s begin.
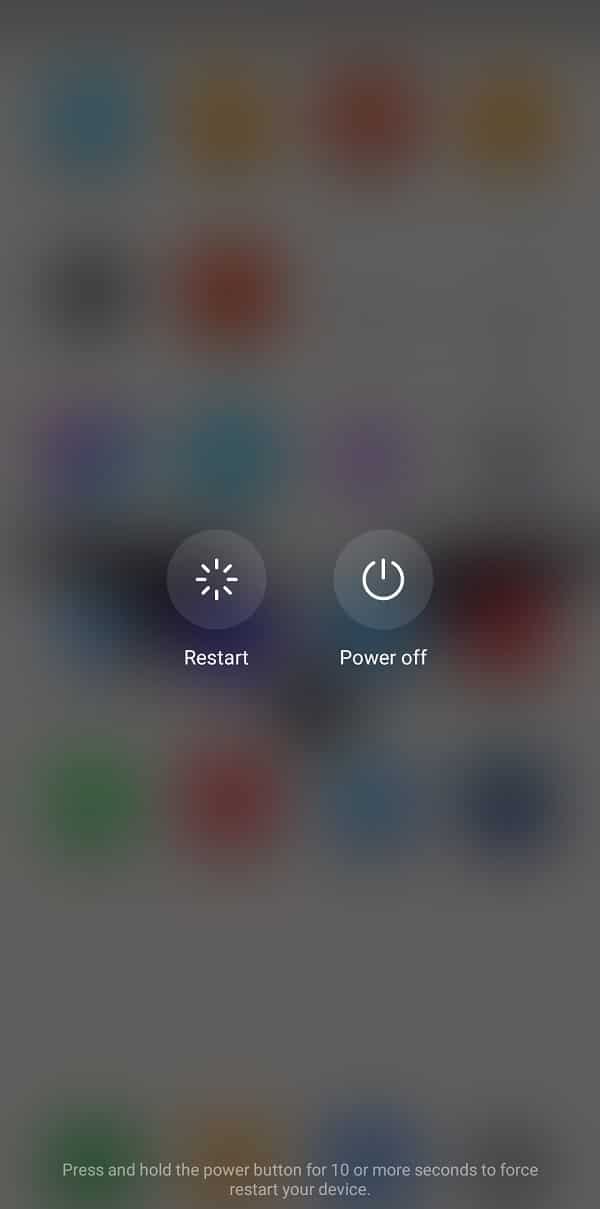
1. Reboot Your Phone
This is the simplest thing that you can do. It might sound pretty general and vague but it actually works. Just like most electronic devices, your mobiles too resolve a lot of problems when turned off and on again. Rebooting your phone will allow the Android system to fix any bug that might be responsible for the problem. Simply hold down your power button until the power menu comes up and click on the Restart/Reboot option. Once the phone restarts check if the problem still persists.
2. Switch Between Wi-Fi and Cellular Data
If you are unable to access the internet while connected to a Wi-Fi network try switching to the cellular network. If you already using your mobile’s cellular data then try connecting to a Wi-Fi network. See if you are able to connect to the internet using either of the options. If yes, then it means that the problem lies with the Wi-Fi or there is connectivity issue at your network service provider’s end. You can continue to use whichever option works for the time being and wait for the other to get fixed. You can make the switch by simply dragging down the quick access menu from the notification panel and switching on the cellular data and turning off the Wi-Fi or vice-versa.
3. Changing DHCP mode
As mentioned above, DHCP automatically configures the settings to allow your device to connect to the Wi-Fi network. If due to some reason the automatic configuration isn’t working properly, you can fix it manually by following these simple steps.
Go to the Settings of your Device.
Now enter the Wireless & networks option.
Click on the Wi-Fi tab.
Now press and hold on the name of the Wi-Fi that you are connected to until you see a pop-up menu.
Now click on the Modify Network option.
Once you select to show advanced option you will find two tabs – one for setting up the proxy and the other for IP settings.
Click on the IP settings option and set it to Static.
Now you will see the option to edit the DNS settings. Enter “8.8.8.8” under DNS 1 column and “8.8.4.4” under DNS 2 column.
Once that is done, save the changes by clicking on the Save button.
Now try connecting to the Wi-Fi and see if you are able to access the internet. Also Read: 6 Ways to Fix “OK Google” Not Working
4. Update your Operating System
Sometimes when an operating system update is pending, the previous version might get a little buggy. The pending update could be a reason behind your internet not working. It is always a good practice to keep your software up to date. This is because with every new update the company releases various patches and bug fixes that exist to prevent problems like this from happening. Therefore, we would strongly recommend you to update your operating system to the latest version.
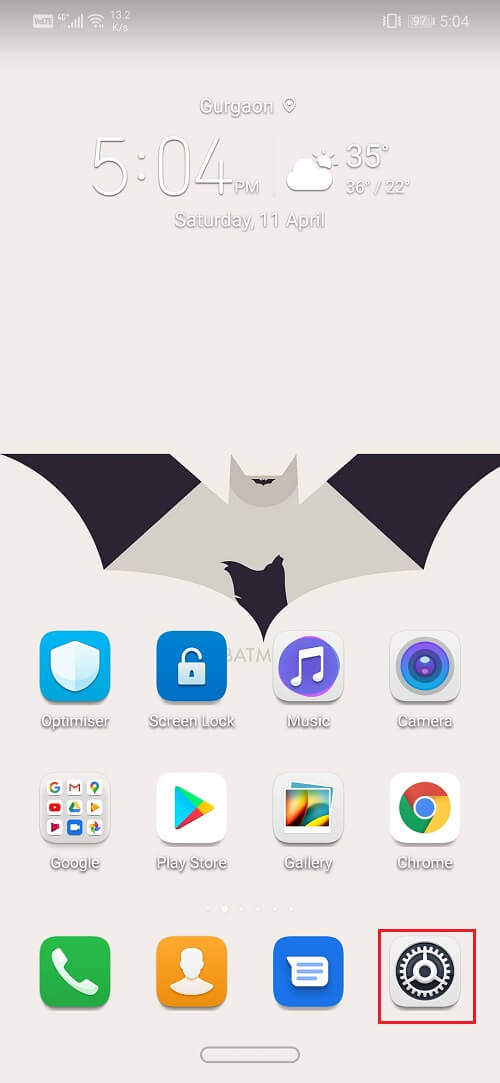
Go to the Settings of your phone.
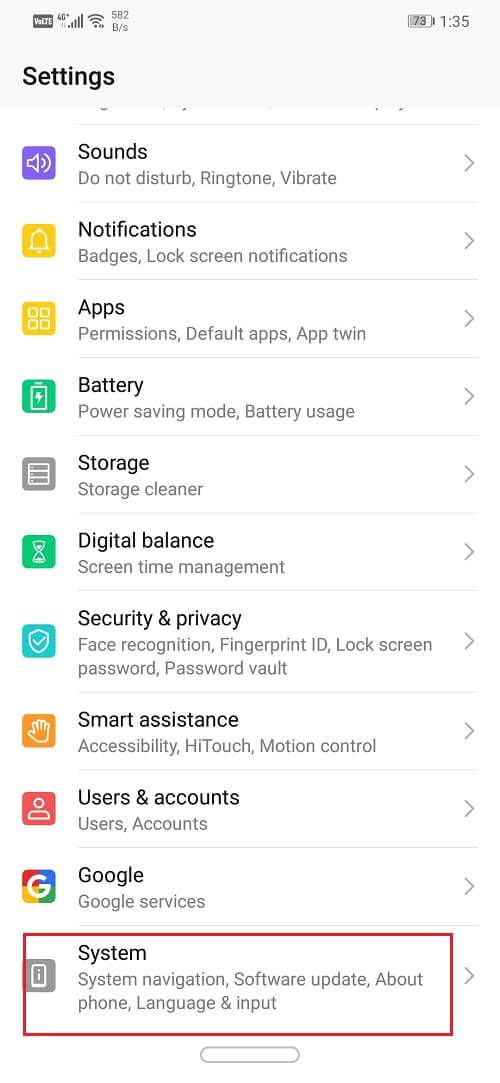
Tap on the System option.
Now click on Software update.
You will find an option to Check for Software Updates. Click on it.
Now if you find that a software update is available then tap on the update option.
Wait for some time while the update gets downloaded and installed. You might have to restart your phone after this. Once the phone restarts try connecting to the Wi-Fi and see if you are able to fix the Internet may not be available error on Android.
5. Forget Wi-Fi network and Connect Again
Sometimes you are unable to connect to the internet even if you are connected to the Wi-Fi or you are unable to connect to a saved Wi-Fi network. The best thing to do in this situation is to forget the particular Wi-Fi network which means deleting information like its saved password. You can choose to forget only one particular saved Wi-Fi network or all of them if you are unable to connect to any of them. However, make sure that you have the login credentials before forgetting a Wi-Fi.
Open Settings on your phone.
Click on the Wireless & networks option.
Now click on the Wi-Fi option.
In order to forget a particular Wi-Fi network, simply tap and hold on until a pop-up menu shows up.
Now simply click on the Forget Network option.
After that re-enter the password and click on the connect option.
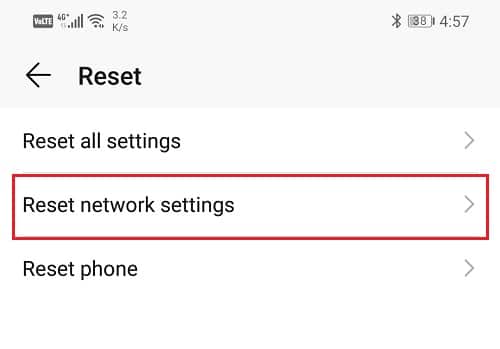
6. Reset Android Network Settings
The next option in the list of solutions is to reset the Network Settings on your Android device. It is an effective solution that clears all saved settings and networks and reconfigures your device’s Wi-Fi. To do this:
Go to Settings of your phone.
Now click on the System tab.
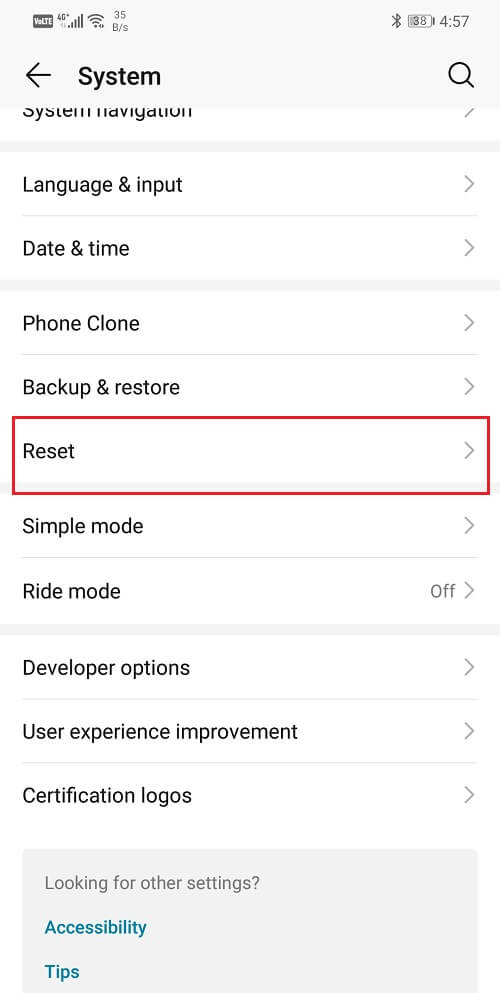
Click on the Reset button.
Now select the Reset Network Settings.
You will now receive a warning as to what are the things that are going to get reset. Click on the “Reset Network Settings” option.
Now try connecting to the Wi-Fi network again and see if you’re able to resolve the Internet May not be Available Error on Android.
7. Start your Device in Safe Mode
As mentioned above, the problem could arise due to some third-party apps. The only way to know for sure is by restarting your device in safe mode. In safe mode, only the system apps would be running. If you are able to connect to the internet in safe mode and the Internet May not be available error does not pop up then it means that the cause of the problem is some app. You need to delete any app that you recently installed from some unknown source and that should solve the problem. It is also important to note that the procedure to reboot in safe mode differs for different phones. You can search online as to how you can start your device in safe mode or try these steps to perform this action:
- Switch off your phone and restart it using the power button.
- While the reboot is underway, long press on both the volume buttons simultaneously.
- Continue this step till the phone is switched on.
- Once the reboot is complete, you will see the Safe Mode notification on the top of your screen.
- Try connecting to the internet now and see if it works properly. If it does then its time for you to figure out the malfunctioning app and delete it. Recommended: 12 Ways to Fix Your Phone Won’t Charge Properly I hope the above steps were helpful and you were able to Fix Internet May not be Available Error on Android, but if you still have any questions regarding this tutorial then feel free to ask them in the comment section.