Fix Graphics Card Not Detected on Windows 10
Reasons behind Graphics card not detected on Startup
There are a variety of reasons that can cause Graphics card not getting detected or Graphics card not turning on issue, namely:
Fix Graphics Card Not Detected on Windows 10 Reasons behind Graphics card not detected on Startup Method 1: Check Graphics Card Slot Method 2: Reinstall Graphics Drivers Method 3: Set Graphics Card to Default Mode Method 4: Show Hidden Devices Method 5: Restore BIOS to default Method 6: Update BIOS Method 7: Enable Discrete GPU in BIOS Method 8: Use Command Prompt Method 9: Uninstall Windows Updates
Faulty drivers Incorrect BIOS settings Hardware issues GPU slot issues Faulty Graphics card Power supply issue
Continue reading to learn about different methods that can help fix the Graphics card not detected issue.
Method 1: Check Graphics Card Slot
First & foremost, you need to ensure that the Graphics card slot on the motherboard of the computer is functioning fine. To fix the Graphics card not turning on issue, first check your graphics card slot:
- Carefully open the side panel of the PC. Now, check the motherboard and the graphic card slots.
- Turn on and turn off the Graphics card and check if the fans are turning on, if not then the Graphics card slot may be faulty. Turn off the computer and insert the Graphics card into another slot. Now, turn it on again to see if it works. If you are not facing any issue with the Graphics card slot, then try the following troubleshooting methods.
Method 2: Reinstall Graphics Drivers
If the Graphics card and its drivers are incompatible, then the Graphics card will not be detected by the computer. Follow these steps to uninstall and then reinstall Graphics card drivers:
Search for Add or Remove Programs in the search bar and then click on it.
Find the Graphics card software, and click on it. Now click on Uninstall as depicted below. In this example, we have done for AMD software.
If you are using an NVIDIA Graphics card, then look for NVIDIA Control Panel in the Add or Remove programs window. Click on it and then select Uninstall.
After the uninstallation is complete, and there will still be few remaining files in the system registry. To remove this, download a clean-up utility like Display Drivers Uninstaller.
Press and hold the Shift key, and click on the Restart button available in the Power menu.
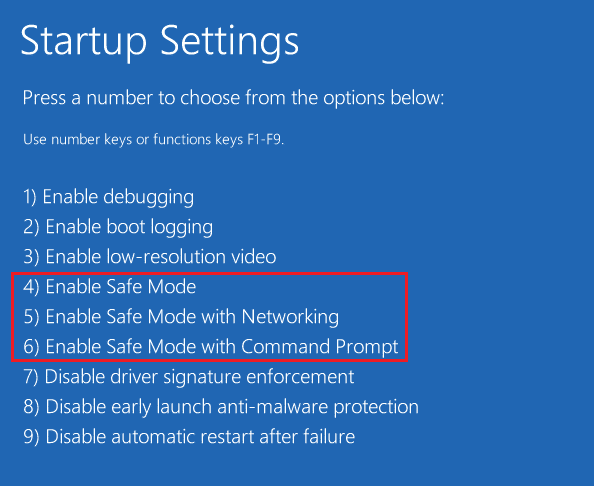
The Windows troubleshooting screen will open. Here, navigate to Advanced Settings > Startup Settings > Restart.
Press the number 4 key to boot the system in Safe Mode.
Next, go to the download folder where you downloaded the Nvidia or AMD clean-up utility, and open it.
Select the Graphics card driver that you want to clean, and then click on Clean and Restart.
Next, visit the website (Nvidia) of the graphics card manufacturer and install the latest graphics card driver for your graphics card. This should fix the graphics card not the detected problem. If it doesn’t, try any of the succeeding solutions. Also Read: Fix Application has been blocked from accessing Graphics hardware
Method 3: Set Graphics Card to Default Mode
To fix Graphics card not detected on Windows 10 issue, follow these steps to set the NVIDIA Graphics card to default mode: For NVIDIA Graphics card:
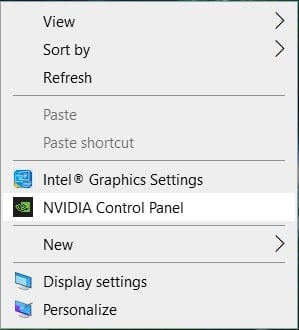
Right-click on the desktop, then click on NVIDIA Control Panel.
Next, click on 3D Settings. From the left pane, select Manage 3D settings.
Click on the Program Settings tab. Here, click “Select a program to customize” then select the program for which you want to use the Graphics card from the drop-down menu.
Next, go to Select the preferred graphics processor for this program and select High-performance NVIDIA processor from the drop-down menu.
Now, run the program that you set NVIDIA Graphics card as default in the previous step. If the program runs correctly, you can repeat the method for other major applications as well. For AMD Radeon Pro Graphics card:
Right-click anywhere on the desktop and then click on AMD Radeon Settings. Read how to fix AMD Catalyst Control Center Missing here.
Click on the Applications tab and then click Add from the top-right corner as shown.
Click on Browse and select the application you want to run using the AMD Graphics card. Also Read: 4 Ways to Update Graphics Drivers in Windows 10
Method 4: Show Hidden Devices
If you recently bought and installed a Graphics card on your computer, follow these steps to make sure that it is not hidden or inaccessible for use:
Press the Windows + R keys together to open the Run dialogue box.
Next, type devmgmt.msc in the Run box and then click OK to launch Device Manager.
Click on View and select Show hidden devices from the drop-down menu.
Next, click on the Action tab, then select Scan for hardware changes, as illustrated below.
Next, Click on Display adapters to expand it and check if your Graphics card is listed there. Note: It will be listed as the name of the Graphics card, video card, or GPU card.
Double-click on the graphics card to open the Properties window. Under the Drivers tab, select Enable. Note: If the Enable button is missing, it means that the chosen Graphics card is already enabled.
Method 5: Restore BIOS to default
Follow these steps to restore BIOS (Basic Input/Output System) to its default settings, a solution that helped many users fix the Graphics card not detected on Windows 10 issue:
Restart your computer. Press either Del, Esc, F8, F10, or F12 when the manufacturer logo appears. The button you have to press differs depending on the computer manufacturer & device model.
Use the arrow keys to navigate and select the BIOS menu.
In the BIOS menu, look for an option titled Restore to defaults or something similar like Load Setup Defaults. Then, select this option and press Enter key.
Now, simply follow the on-screen instructions to save changes.
Once done, reboot the system and check if the issue is resolved. If not, try updating BIOS.
Method 6: Update BIOS
BIOS performs hardware initialization i.e., it starts hardware processes during the booting process of the computer. Follow these steps to update BIOS settings to fix the Graphics card not detected error: Note: Make sure to back up the system before updating BIOS settings since it can lead to loss of data or cause other serious problems.
Press the Windows + R keys together to open the Run dialogue box.
Next, type msinfo32 and then click OK.
Check the information under BIOS Version/Date.
Next, visit the manufacturer’s website and go to the Support or Download section. Then, search for the latest BIOS update.
Download and install the latest BIOS setup.
Restart your computer and check if the problem has been fixed.
Method 7: Enable Discrete GPU in BIOS
If your system has both the integrated and discrete Graphics present, then Windows will only detect the discrete GPU if enabled in BIOS.
- Press the specific key to enter BIOS while the computer is booting, as observed in Method 5.
- Navigate to Chipset, and search for GPU (Discrete Graphic Processing Unit) Configuration. Note: These settings will be different depending on your computer/laptop manufacturer.
- In the GPU feature, click on Enable. Windows will now be able to detect both integrated & discrete GPU from here onwards. In case the detection issue perseveres, check out the next method.
Method 8: Use Command Prompt
Users who reported the ‘NVIDIA Graphics card not detected’ issue could resolve it by running a specific command in Command Prompt:
Search for cmd in the Windows search and then click on Run as administrator.
Type bcedit /set pciexpress forcedisable, and then press Enter key.
Install the drivers again as detailed in Method 2, and then check if the issue has been resolved.
Method 9: Uninstall Windows Updates
If you’re still facing the error ‘Graphics card not turning on’ or ‘Graphics card not detected’ then faulty Windows updates can be the issue, follow these steps to uninstall them:
Press Windows + I keys together to open Settings then click Update & Security.
From the left-hand menu select Recovery.
Click on Get started under the Go back to an earlier build section.
This would uninstall recently installed Windows updates. Recommended:
[SOLVED] Windows detected a hard disk problem Fix NVIDIA Control Panel Missing in Windows 10 How to use MAME to Play Arcade Games on Windows PC How to Fix uTorrent Access is Denied
We hope that this guide was helpful and you were able to fix Graphics card not detected on Windows 10 issue. Let us know which method worked best for you. If you have any queries/comments regarding this article, feel free to drop them in the comment section.


![]()

