How to Fix External Hard Drive Not Accessible in Windows 10
External hard drive problems can be caused because of multiple reasons, including:
How to Fix External Hard Drive Not Accessible in Windows 10 Method 1: Basic Troubleshooting Steps Method 2: Verify Hard Drive Format Method 3: Update Device Drivers Method 4: Reinstall Device Drivers Method 5: Run CHKDSK Scan Method 6: Test Hard Drive in Safe Mode Method 7: Change Drive Letter Method 8: Create Partition for New Hard Drive Method 9: Enable Hidden Devices to Display
Unplugged hard drive without proper ejection. Unsupported or outdated driver. Recently fallen or damaged. Error in either device ports or hard drive’s USB cable. Corrupted due to viruses or malware.
Note: Before we begin to solve your query regarding can external hard drives be repaired or not, do not even try to hit, gentle tapping, or shake the hard drive. The tapping and hitting mechanism may work with other electronic devices, but doing it on the hard drive will make the problem even worse. Also, while performing these methods, or if at any time you can access your hard drive on your PC, make sure to back up or transfer all the important data.
Method 1: Basic Troubleshooting Steps
Follow these basic steps to fix external hard drive problems in Windows 10.
Restart your system and then try to connect it back. Remove the drive from its cover or case and place it on a flat surface before plugging it in. Unplug and try it on other ports of the PC. If you are using a USB 3.0 port, then try USB 2.0. Also, try connecting to other external devices, such as a keyboard, printer, or mouse. If you have trouble connecting those devices as well, the problem could be with the ports or the drivers. Examine the USB cable from both ends. Check that it is not broken or damaged. Also, when connecting the hard drive, try a different USB cable; the problem could be in the cable. Test the hard drive on another PC. If it works, it means the issue is with the device or ports.
Method 2: Verify Hard Drive Format
There are two major drive formats, ExFAT which work on both Mac and Windows operating systems, whereas NTFS is only compatible with Windows. If you are connecting a hard drive that is in Mac OS format, then Windows will not detect it. Hence, to connect the hard drive to Windows, you need to format in ExFAT format. Follow the method 8 steps to change the format of hard drive. To check format of your hard drive, do the following:
Open File Explorer by hitting the Windows + E keys together.
Click on This PC, then right-click on your hard drive and click on Properties.
The format of your hard drive will be written in the General tab, next to File system.
Also Read: Fix The Disk Check Could Not be Performed Because Windows Cannot Access the Disk
Method 3: Update Device Drivers
One of the main reasons behind external hard drive not accessible error message appearance could be because of a faulty or outdated driver which doesn’t support your device. Follow our guide on how to update device drivers on Windows 10.
Method 4: Reinstall Device Drivers
The option Scan for hardware changes will identify all the hardware connected to your PC and based on that the default driver will be installed. To fix the error, you need to uninstall the disk drives and USB drivers temporarily and reinstall them again. Read our guide to uninstall and reinstall drivers on Windows 10.
Also Read: Fix Windows Found Drivers for Your Device but Encountered an Error
Method 5: Run CHKDSK Scan
Chkdsk stands for Check Disk. It’s an inbuilt drive scanner that will identify and fix all errors that happen due to malware, corrupt system files, or improper shutdown. Follow our guide to check disk errors using chkdsk command.
Method 6: Test Hard Drive in Safe Mode
There are high chances that you can access the drive in safe mode if external hard drive not accessible on normal mode. Possibly there could be a file or settings that may be interfering in normal Windows mode. In safe mode, the functionality is limited and only the primary driver is loaded. Follow these steps to turn on safe mode to fix external hard drive problems.
Press the Windows key, type System Configuration, and press enter key.
Then go to Boot tab, click on Safe boot and click on OK.
After that, click on Restart.
Once your system reboots in safe mode, then launch File Explorer and check whether the external hard drive is accessible or not.
Then, go back to System Configuration and click on Normal startup to boot normally or else it will keep booting into Safe mode. And, then click on OK.
Click on Restart.
Also Read: 10 Ways to Free Up Hard Disk Space On Windows 10
Method 7: Change Drive Letter
External hard drive not accessible error occurs if there are two drives with a similar name which could be causing confusion between the paths. Make sure that each drive has its own unique name/letter. Here’s how to change it:
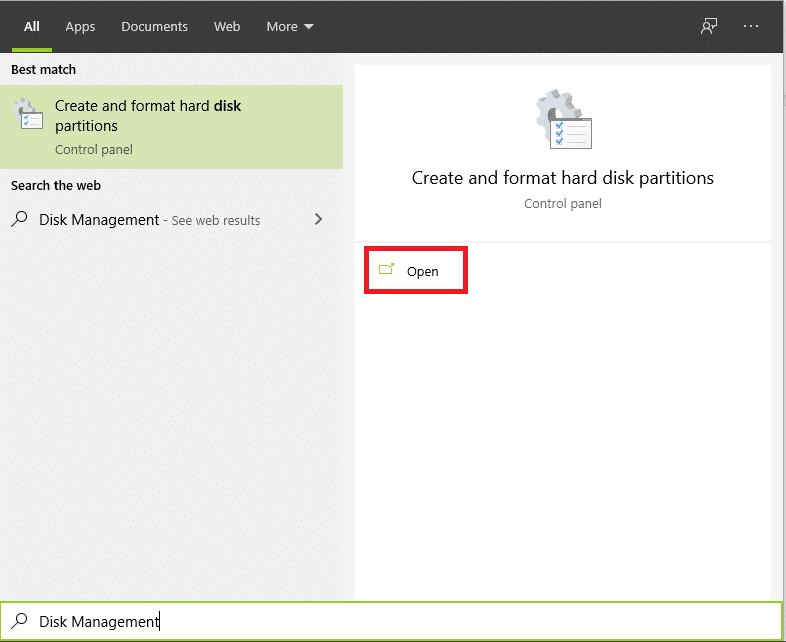
Press the Windows key, type Disk Management, and click Open as shown.
Right-click on your drive and then click on Change Drive Letter and Paths….
Click on Change….
Then choose a new letter from the drop-down menu and click on OK.
Finally, restart the PC.
Method 8: Create Partition for New Hard Drive
If you are trying to connect a new or formatted hard drive and facing external hard drive not accessible problems, the reason could be that the drive is without any partition. Partition is used to allow storage space and allotment. Do the following to make a partition:
Plug in your hard drive.
Launch the Disk Management app.
Right-click on the hard drive where the black bar can be seen and click on New Simple Volume… option as depicted below.
Click on the Next > button.
Set the size and name for the drive on upcoming screens and click on Next.
Then select Format this volume option and choose NTFS file format for Windows or ExFat which is compatible on Mac as well. And click on Next>.
And, click on Finish. Note: By selecting the format option will erase all the data on your external hard drive. Also Read: Fix: New Hard Drive not showing up in Disk Management
Method 9: Enable Hidden Devices to Display
In most of the Windows operating systems, hide empty driver option is enabled by default. Or, if mistakenly the option has turned on, that could be the reason you are going through external hard drive problems. Do the following to get rid of it: Option I: Enable Hidden Device
Press the Windows key, type Command Prompt and click on Run as administrator.
Click on Yes to grant permission.
Then, type the following command and hit the Enter key.
Now press the Windows key, type Device Manager and click on Open.
Next, click on View and click on Show hidden devices.
Replug your external hard drive and check whether it’s accessible or not. Option II: Check Hidden files
Hit the Windows + E keys together to launch File Explorer.
Then, click on View tab and click on Options.
Go to View tab, uncheck Hide empty drives option and click on OK.
Q1. Why do I need to eject hard drive before unplugging it? Ans. Simply put, you need to instruct the computer to halt whatever process it is performing on the hard drive. If you unplug it without ejecting the drive, the files may become corrupted, resulting in a damaged hard drive. Q2. How can I keep my hard drive in better condition? Ans. Keep it in a good case to protect it from dust and unintentional accidents. Keep it cool and unplug it when not in use; the more it is used, the shorter its life will be. It’s a highly sensitive device, do not drop or shake it. While in use, place on a flat surface and avoid putting over shaky or vibrating surfaces such as speakers or sound whopper. Clean it frequently with a dry cloth and avoid using it outside in direct sunlight. Recommended:
Fix System Error Code 1231 in Windows 10 Fix Error 0x80070718 in Windows 10 Fix C Drive Keeps Filling Up for No Reason Fix Hard Disk Problems in Windows 10
We hope that this guide was helpful and you were able to fix External Hard Drive not Accessible problem and also know about that can external hard drives be repaired or not. Let us know which method worked for you best. If you have any queries or suggestions regarding any tech-related issues, then feel free to drop them in the comments section below.