- Windows protected your PC
- Windows SmartScreen prevented an unrecognized app from starting. Running this app might put your PC at risk.
But SmartScreen is not always helpful for advanced users as they already know which apps are safe and which aren’t. So they have a fair knowledge about the applications they want to install, and an unnecessary pop-up by SmartScreen might be only seen as a hurdle rather than a useful feature. Also, these apps are termed as unrecognized because Windows doesn’t have any information about it, so any app you directly download from the internet possibly made by a small developer would be unrecognized. However, I am not saying that SmartScreen is not a useful feature, but it isn’t useful for advanced users, so they might be looking for a way to disable this feature.
If you are a beginner Windows users and don’t have any information about what’s safe and what isn’t to download, then it’s advised that you don’t mess with the SmartScreen settings as it can stop harmful application being installed on your PC. But if you really want to disable the SmartScreen feature in Windows, then you have landed on the right page. So without wasting any time let’s see how to actually Disable SmartScreen Filter in Windows 10 with the below-listed guide.
Disable SmartScreen Filter in Windows 10
Make sure to create a restore point just in case something goes wrong.
Disable SmartScreen Filter in Windows 10 Disable SmartScreen Filter for Internet Explorer Disable SmartScreen Filter for Microsoft Edge
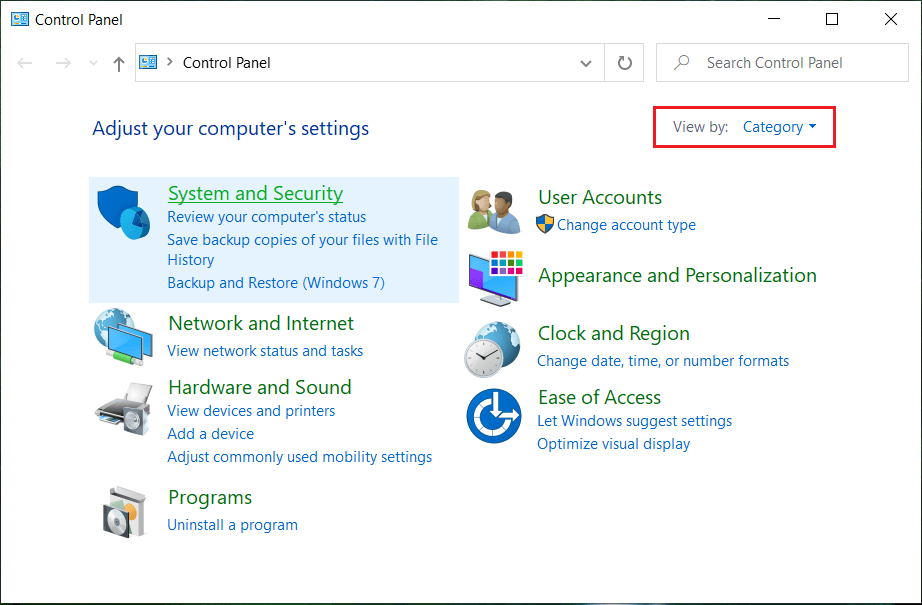
Press Windows Key + X then select Control Panel.
Click System and Security & then click Security and Maintenance.
Now, from the left-hand side menu, click on Change Windows SmartScreen settings.
Checkmark the option saying “Don’t do anything (turn off Windows SmartScreen).”
Click OK to save changes.
After this, you will get a notification telling you to Turn on Windows SmartScreen.
Now, to make this notification go away click this message.
In the next window under Turn on Windows SmartScreen, click Turn off messages about Windows SmartScreen.
Reboot your PC and enjoy. Now that you have disabled SmartScreen you won’t see the message telling you about unrecognized apps. But your problem doesn’t go away as now there is a new window which says “The publisher could not be verified. Are you sure you want to run this software?” To completely turn off these messages, you could follow the guide below:
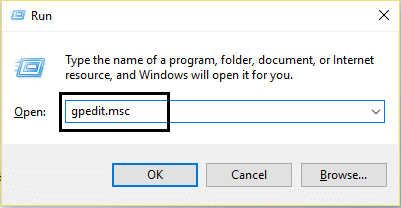
Press Windows Key + R then type “gpedit.msc” (without quotes) and hit Enter.
Navigate to the following path by double-clicking on each of them: User Configuration > Administrative Templates > Windows Components > Attachment Manager
Make sure you have highlighted Attachment Manager in the left window pane than in the right window pane double-click on “Do not preserve zone information in file attachments.”
Enable this policy in the Properties window and then click Apply, followed by OK.
Reboot your PC to save changes. If you’re Windows 10 Home edition user then you won’t be able to access Group Policy Editor (gpedit.msc), so the above can be achieved via using Registry Editor:
Press Windows Key + R then type regedit and hit Enter.
Navigate to the following Registry Key: HKEY_CURRENT_USER\Software\Microsoft\Windows\CurrentVersion\Policies\Attachments 3.If you can find the Attachments key then select Policies then right-click New > Key and name this key as Attachments.
Make sure to highlight Attachments key and find the SaveZoneInformation in the left window pane. Note: If you can find the above key, create one, right-click on Attachments, then select New > DWORD (32-bit) value and name the DWORD SaveZoneInformation.
Double click on SaveZoneInformation and change its value to 1 and click OK.
Close Registry Editor and reboot your PC to save changes.
Disable SmartScreen Filter for Internet Explorer
Open Internet Explorer then clicks the Settings (gear icon).
Now from the context menu, select Safety and then click on Turn off SmartScreen Filter.
Check to mark the option “Turn On/off SmartScreen Filter” and click OK.
Close Internet Explorer and reboot your PC.
This would Disable SmartScreen Filter for Internet Explorer.
Disable SmartScreen Filter for Microsoft Edge
Open Microsoft Edge then clicks on the three dots in the right corner.
Next, from the context menu, select Settings.
Scroll down till you find View Advanced Settings then click it.
Again scroll down to the bottom and turn off the toggle for “Help protect me from malicious sites and downloads with SmartScreen Filter.”
This would Disable SmartScreen Filter for Microsoft edge.
Reboot your PC to save changes. Recommended:
Fix Touchpad is not working in Windows 10 Fix Screen Goes to Sleep when Computer Turned ON Disable Pinch Zoom Feature in Windows 10 Fix System icons missing from Windows Taskbar
That’s it you have successfully learned How to Disable SmartScreen Filter in Windows 10 but if you still have any questions regarding this guide then feel free to ask them in the comment’s section.