The error message “You can try to restart Engine, or your PC” is known to appear when trying to open the application, but restarting both of them achieves absolutely nothing. There are a number of culprits that might be prompting the error, including an inherent bug in a certain version of Bluestacks, restrictions imposed by antivirus software, etc. Below are all the solutions that are known to resolve the ‘Could Not Start the Engine’ error in Bluestacks explained in a step by step manner.
How to fix Bluestacks Engine won’t start?
As mentioned earlier, there are multiple reasons why the Bluestacks engine might be failing to start. So no one shoe fits that fits all, and the solution to each user/computer will be unique. Try all the below solutions one by one and after performing each, run Bluestacks to check if the problem has been resolved.
How to fix Bluestacks Engine won’t start? Method 1: Switch to DirectX and increase the number of CPU cores & allocated RAM Method 2: Run Bluestacks in compatibility mode for & grant complete security access Method 3: Turn on Virtualization Method 4: Uninstall Bluestacks and reinstall in safe mode Method 5: Revert back to a previous Windows version
Before you move to the more advanced solutions, try temporarily disabling your antivirus software (Windows Defender by default). Every third-party application, particularly Bluestacks, is always under an antivirus software’s radar, leading to software conflicts; these conflicts can adversely affect the application’s performance and cause several issues. The method of disabling an antivirus application is unique for each. However, most can be disabled by right-clicking on their icons present in the system tray and then selecting the appropriate options. If disabling your antivirus indeed solved the problem, switch to another antivirus software or add Bluestacks to its exception list. If not, well, we have 5 more solutions for you to try.
Method 1: Switch to DirectX and increase the number of CPU cores & allocated RAM
Bluestacks is primarily an android gaming emulator. Therefore, switching up its graphics mode is known to be an easy fix to the engine won’t start issue. By default, Bluestacks runs using OpenGL, but it can also be run via DirectX. The option to make the switch is present in Bluestacks settings. If merely changing the graphic mode doesn’t work, you can always increase the number of CPU cores and RAM allocated to Bluestacks and provided it a little more juice to run.
Launch Bluestacks by double-clicking on its desktop shortcut icon or search for the application in the windows search bar (Windows key + S). If you receive the ‘engine won’t start’ error message again, simply ignore it for the time being.
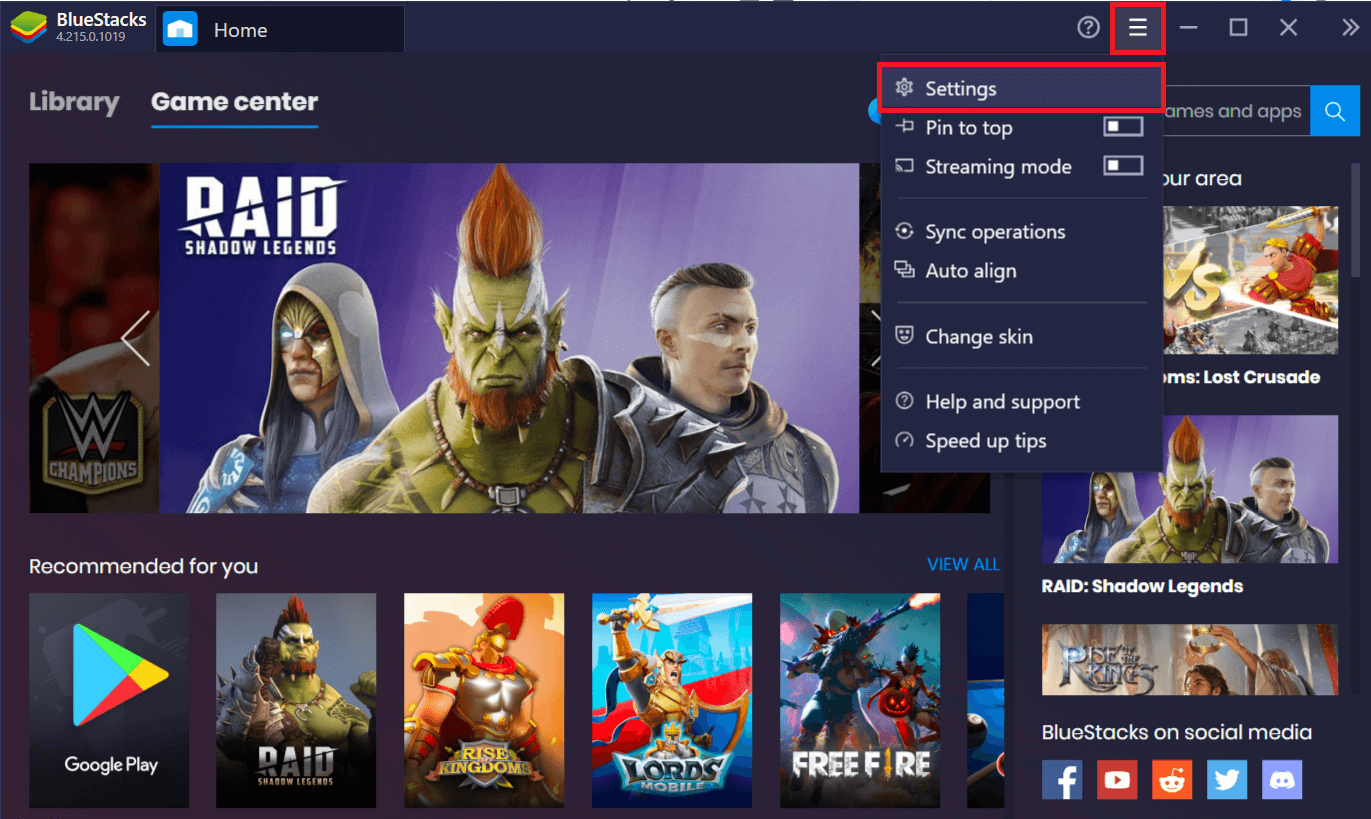
Click on the Bluestacks Menu button (three horizontal dashes or a downward-facing arrow capped with a horizontal dash in some previous versions) present at the top-right corner of the application window (next to the resize window and close buttons).
From the ensuing drop-down menu, click on Settings.
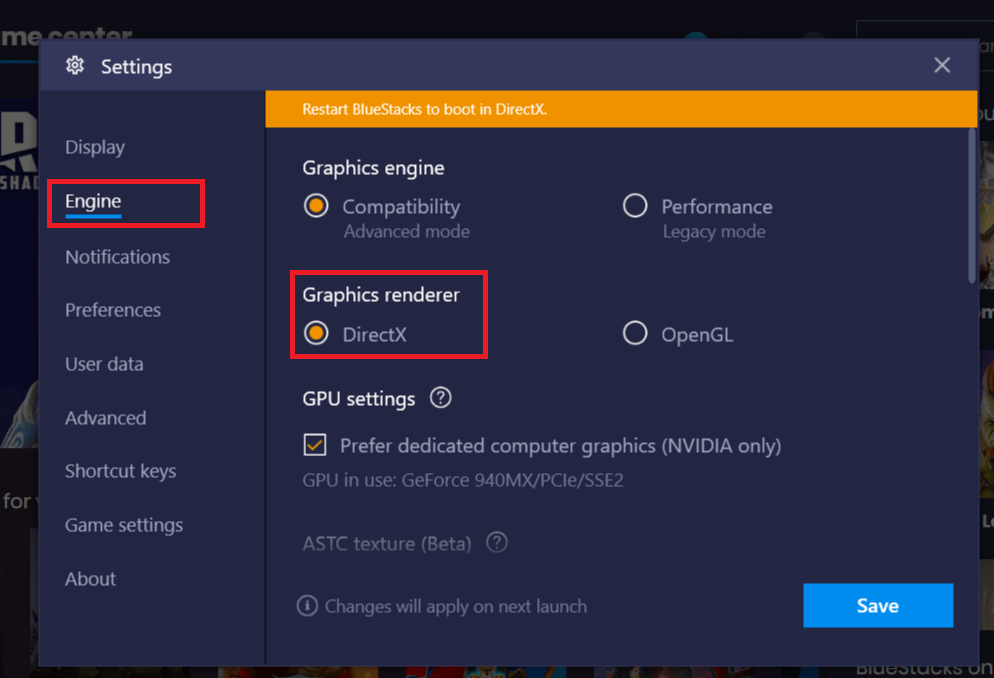
Switch to the Engine settings pane by clicking on the option present at the left side of the Settings window.
Under Graphics Renderer, click on the radio button next to DirectX.
A message reading ‘Checking DirectX compatibility’ will appear on the top of the screen, followed by another message asking you to ‘Restart Bluestacks to boot in DirectX’.
Click on the Save button first, and in the next dialog box, click on the ‘Restart Now’ button.
Bluestacks will now launch using DirectX and hopefully, the error you have been experiencing will be resolved. However, if switching to DirectX graphics mode didn’t work, try increasing the number of cores and RAM allocated to Bluestacks. Repeat steps 1 to 5 of the above procedure and switches to DirectX. Before clicking on the Save button, adjust the RAM (MB) slider to the ‘Recommended Memory’ value, if it isn’t set at it by default. Now, click on Save, followed by Restart Now.
If on return, the Bluestacks engine still won’t start then change the number of CPU cores allowed for Bluestacks to use. Increase the number of CPU cores by 1 and restart. Continue to increment the number of cores by 1 if you continue to receive the error until you find the sweet spot. You can also adjust the Memory (MB) slider every time you increase the number of CPU cores to find the perfect combination.
Method 2: Run Bluestacks in compatibility mode for & grant complete security access
It is also quite possible that Bluestacks doesn’t have the necessary security clearance to run on your computer. The security settings might have changed after the latest Windows update or application update. To grant Bluestacks full control:
Right-click on Bluestacks’ desktop shortcut icon and select Open file location from the context menu. If you do not have a shortcut icon in place, head to the following location C:\ProgramData\BlueStacks\Client in file explorer.
Locate the Bluestacks.exe file, right-click on it, and select Properties. (or select the file by left-clicking and press Alt + Enter)
Switch to the Security tab of the Properties window and click on the Edit button in-line with To change permissions, click Edit.
First, select your username from the list of users displayed under group or user names, and under Permissions for username, check the box in the Allow column for Full control.
Click on Apply to save changes and then OK to exit. See if you’re able to fix the Bluestacks engine won’t start issue. If not, then you can also run Bluestacks in compatibility mode for another Windows version if you have been facing the error only after updating to Windows 10. To do so:
Right-click on the Bluestacks’ shortcut icon and select Properties.
Check ‘Run this program in compatibility mode for:’ in the compatibility tab.
Select an appropriate Windows version to run Bluestacks in compatibility for and click on Apply followed by OK.
Method 3: Turn on Virtualization
Bluestacks, at its core, is a virtualizing application. Certain chipsets of Intel and AMD incorporate a virtualization technology, which boosts their performance when any virtualizing software such as Bluestacks is being used. The technology helps such software run more smoothly and without any strain. Enabling Virtualization has been reported to resolving the Bluestacks engine won’t start issues by some users. Although not all systems are equipped with the technology, and you will need to perform a check for it before going ahead with this method. To check if your Intel system supports Virtualization technology:
Visit the following page Download Intel® Processor Identification Utility in your preferred web browser and click on the Download button present on the left side (under Available Downloads). Depending on your internet speed, the File will be downloaded in a couple of seconds or minutes.
Once downloaded, click on the installation file and follow the on-screen prompts/instructions to install Intel Processor Identification Utility on your computer.
Open the Utility application once installed and expand the CPU technologies section by clicking on + icon. (At the time of launching, a user account control asking you permission to allow the application to make changes to your system will appear. Click on Yes to proceed.)
Scan the CPU technologies list for Intel® Virtualization Technology (usually the very first item in the list). If your system supports the technology, there will be a resounding check to its left (or a yes next to it).
To check if your AMD system supports Virtualization:
- Open the following page Download AMD Virtualization Technology and Microsoft Hyper-V System Compatibility Check Utility in your preferred browser to download the required file.
- Click on the downloaded .exe file and follow the instructions to install it.
- Open the application to check if your system supports Virtualization technology. If it does, you will receive the following message “The system is compatible with Hyper-V”.
If your Intel or AMD system supports Virtualization technology, follow the below steps to enable it. If it doesn’t, jump to the next method.
- Virtualization can be enabled from the BIOS menu, for which you will need to restart/reboot your computer.
- Click on the start button or press the Windows key on your keyboard, click on the Power option, and select Restart.
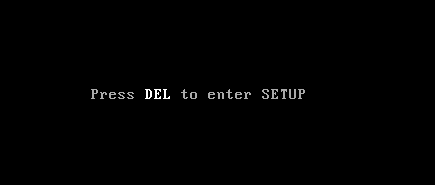
- When your computer manufacturer’s logo appears, press one of the following keys repeatedly to enter BIOS – Esc, Del, F12, F10, or F8. The BIOS key is unique to each manufacturer, so check the papers that came with your computer or perform a simple Google search for your BIOS key.
Note: Some manufacturers also include a small message at one of the screen corners (For example: “Press Esc to enter BIOS”) when their logo appears, so be on the lookout for that. 4. Once in the BIOS menu, navigate to Virtualization Technology or Intel Virtualization Technology or Intel VT for Direct I/O or any similar option using the arrow keys and press enter to enable it.
- Save your changed settings and exit BIOS. The computer will now reboot automatically, and once it does, check if you are able to fix Bluestacks engine won’t start issue. Also Read: 9 Best Android Emulators For Windows 10
Method 4: Uninstall Bluestacks and reinstall in safe mode
If none of the above-explained methods worked, it is possible that the issue is an inherent bug in the application itself. In that case, you will need to uninstall the current version and replace it with the most updated build of Bluestacks.
We will start by ending any and all Bluestacks processes that might be running in the background.
If you have Bluestacks open, close it by clicking on the X button at the top-right and right-click on the Bluestacks icon on your system tray and select Quit. If that doesn’t work for some reason, open Task Manager (Ctrl + Shift + Esc), locate all the Bluestacks processes & services and end them (right-click > End Task).
As a precautionary measure, we will also be deleting all the temporary files on our computer. To do so, type %temp% in either the Run command box (Windows key + R) or the start search bar and press enter.
In the following File Explorer windows, press ctrl + A to select all items and press shift + del key to permanently delete them. If you receive any prompts asking for administrative permission, grant them. Skip files that can’t be deleted.
Instead of following the usual route for deleting an application, we will use the official Bluestacks uninstaller to remove all traces of it from the computer to perform a clean install later on.
Click on the following link BSTCleaner to download the Bluestacks uninstaller tool. Run the application once downloaded to remove Bluestacks from your computer and all of its files. Grant any permissions it asks for. Click on the OK button at the final screen when done.
Alternatively, remove Bluestacks via Windows Settings (Settings > System > Apps & Features. Click on Bluestacks and select Uninstall) and then manually delete the folders at the respective paths:
Time to reinstall Bluestacks now. Head over to Download Bluestacks and download the latest version of the application.
We will be installing the application after booting into Safe Mode.
Once Window starts in Safe Mode, head over to the folder (Downloads) where you downloaded the Bluestacks installation file and run it. Follow the on-screen instructions to finish the installation.
Now that we have reinstalled Bluestacks, we can turn off Safe Mode and boot back normally.
Open Run, type msconfig, and press enter. In the Boot tab, untick the box next to Safe mode and click on OK.
Finally, restart your computer and run Bluestacks to check if the problem has been resolved.
Method 5: Revert back to a previous Windows version
Sometimes a new Windows update may be incompatible with Bluestacks leading to the Engine won’t start issue. Try to recollect if the issue started after your recent Windows update. If it did, you could either wait for Microsoft to roll a new update and hope they fix the issue or revert back to the previous one that didn’t cause the engine startup error.
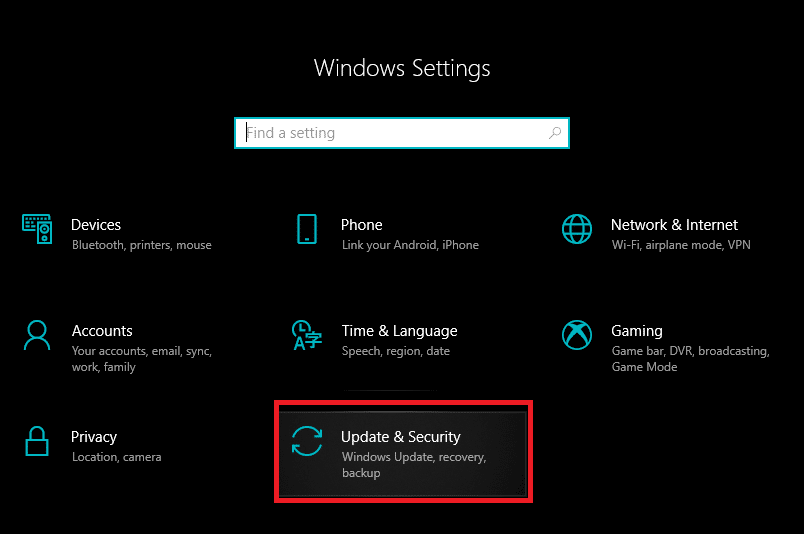
Launch Windows Settings by clicking on the start button and then the cogwheel icon. (or press Windows key + I to directly launch settings).
Click on Update & Security.
Find Recovery settings in the left panel and click on it.
Click on the Get Started button under the ‘Go back to the previous version of Windows 10’. Follow the ensuing on-screen instructions to revert back to a previous build of the OS.
Unfortunately, if it has been more than 10 days since you last updated Windows, the Get Started will be greyed out, and you won’t be able to revert back. Your only option then is to wait for a new update to be rolled out. Recommended:
Fix A problem has occurred in BitDefender threat scanner 7 Ways to Fix Taskbar Showing in Fullscreen
We hope this article was helpful you were able to Resolve the Bluestacks Engine Won’t Start issue. But if you still have any questions regarding this tutorial then feel free to ask them in the comment section.